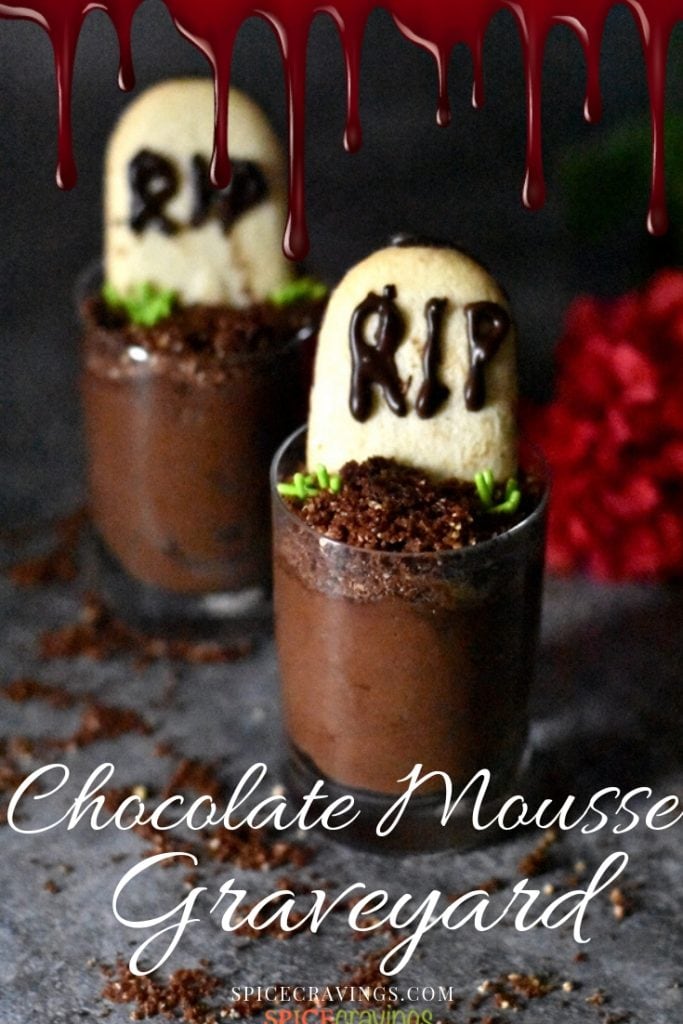
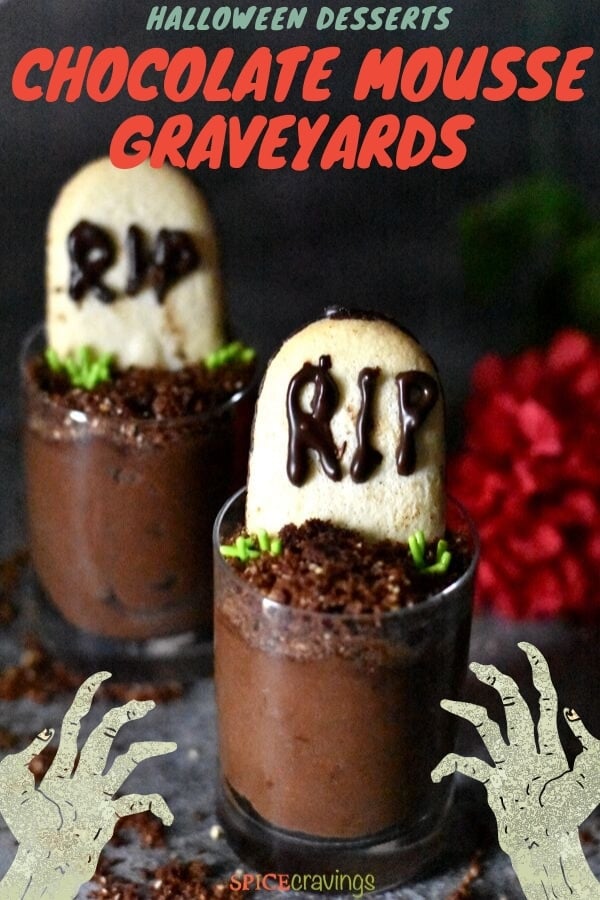
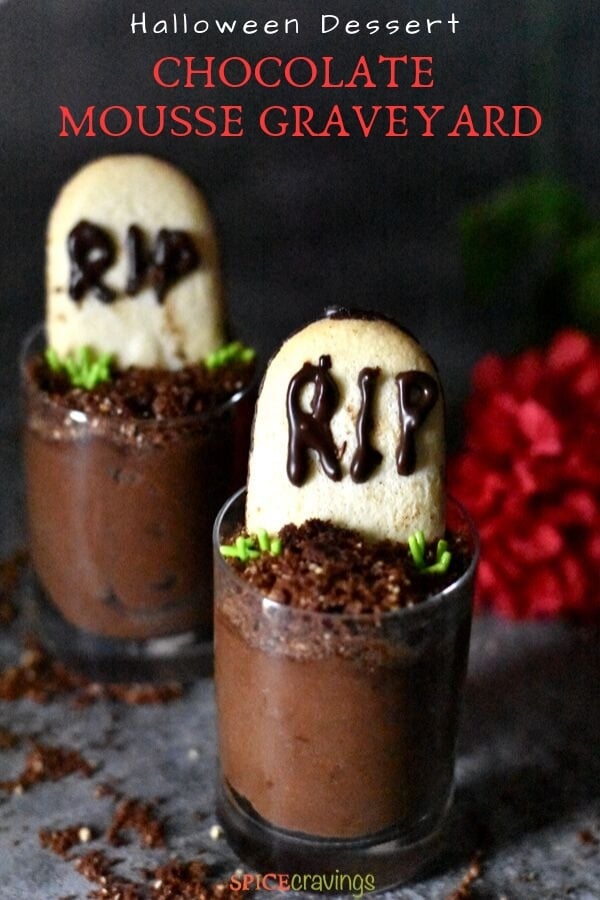
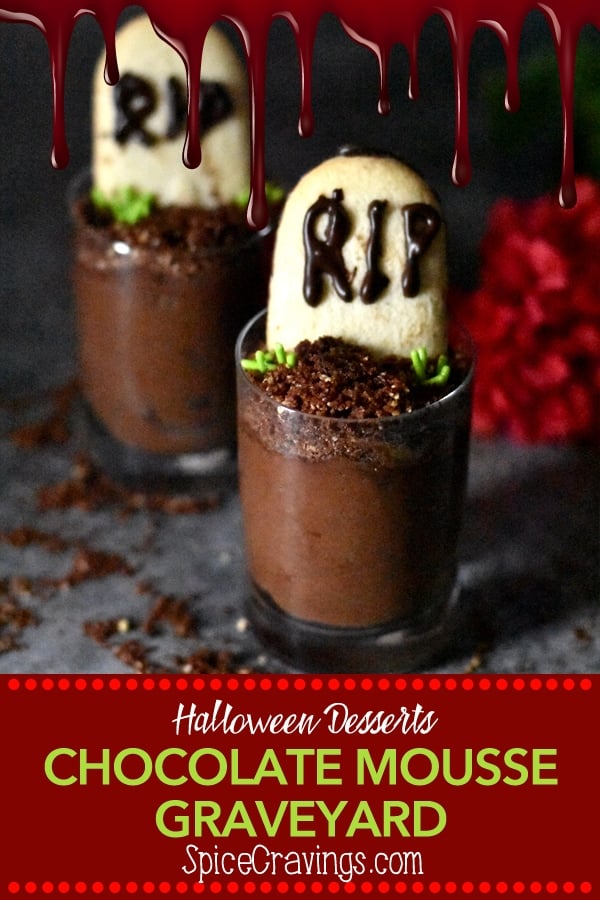
Chocolate Mousse Graveyards are the perfect fun dessert for Halloween. Rich, decadent, and silky-smooth mousse in shot glasses topped with chocolate cookie dirt and a vanilla cookie gravestone. Whip up this no-bake, eggless, and fuss-free dessert with your kids and enjoy some family Halloween fun.
Want to save this recipe?
Jump to:
Easy No-Bake, Eggless Dessert
My family loves chocolate mousse and we've made this recipe countless times. It literally comes together with six easily available ingredients and is easy enough for little kids to help out with.
It's eggless, so no baking or any complicated steps involved. A hand blender is all you need to whip up this decadent dessert.
This recipe is courtesy of my two Teens Chefs, my girls! They made this dessert to enjoy with their friends after trick-or-treating.
They took my recipe for a classic chocolate mousse, and with a little inspiration from Pinterest Wonderland, they transformed it into this awesome and creepy graveyard version.
5 Reasons to Love this Halloween Treat
- Takes only 15 minutes to make this rich & decadent dessert
- It's a perfect creepy & fun dessert for a Halloween party
- It's eggless, so no extra steps of whipping the egg whites
- My girls put it together with just 6 easily available ingredients
- It's great for school Halloween parties- the kids have so much fun putting their spin for decorating the graveyards.
Another fun Halloween Dessert: Easy Mummy Brownies
How to Make Chocolate Mousse Graveyards
Here are the step-by-step instructions to make the chocolate mousse graveyards:
Melt Chocolate Chips
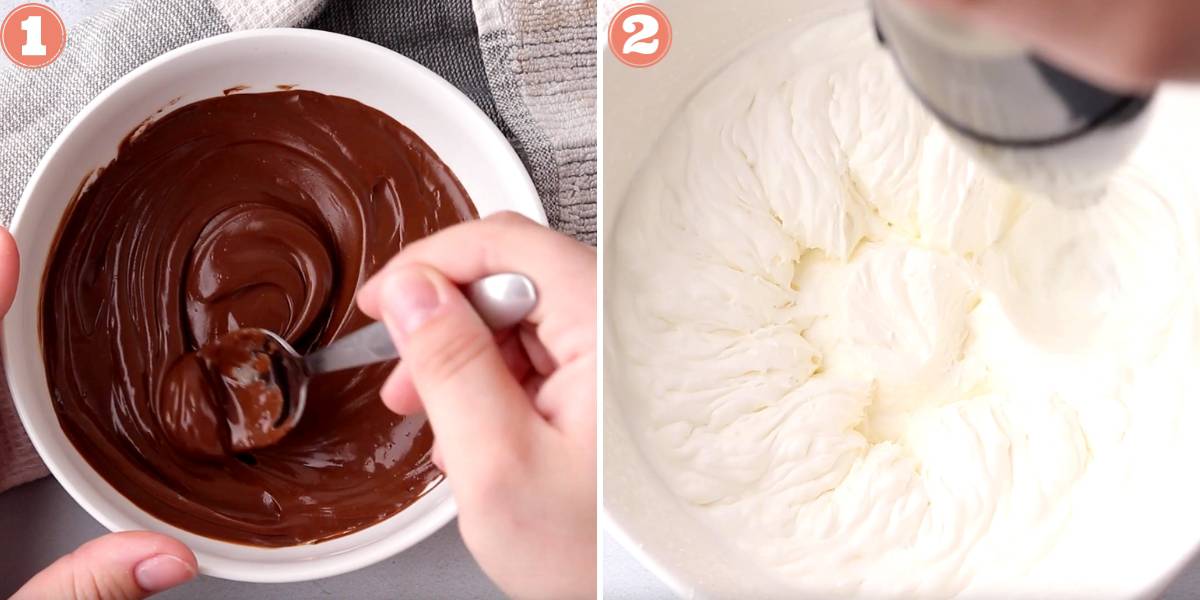
Melt dark chocolate chips using the double-boiler or in the microwave (pic 1). For this quantity or less, it might just be easier to microwave the chocolate. Here are both methods, you can use whatever you are most comfortable with:
Double boiler method: Fill a tall pot about ¼ full with water and bring to a boil. Reduce the heat to a simmer. Reserve 2 tablespoons for later and add ½ cup chocolate chips to a smaller heat-safe bowl and fit in on TOP of the pot such that, there is at least 3″ space between the bowl and water.
Microwave method: Using 20-second increments, melt the chocolate chips in the microwave using the default heat setting. It takes about 40-60 seconds. Time may vary a bit depending on your microwave. Stir every 20 seconds.
Beat Heavy Whipping Cream
While the chocolate cools, beat heavy whipping cream and confectioner's sugar, until it makes soft peaks. The time for this depends on quantity, kind of mixing gadget (stand mixer or electric mixer), and speed of mixing. The end result should resemble the consistency of canned whipped cream. (pic 2)
Prepare the Mousse
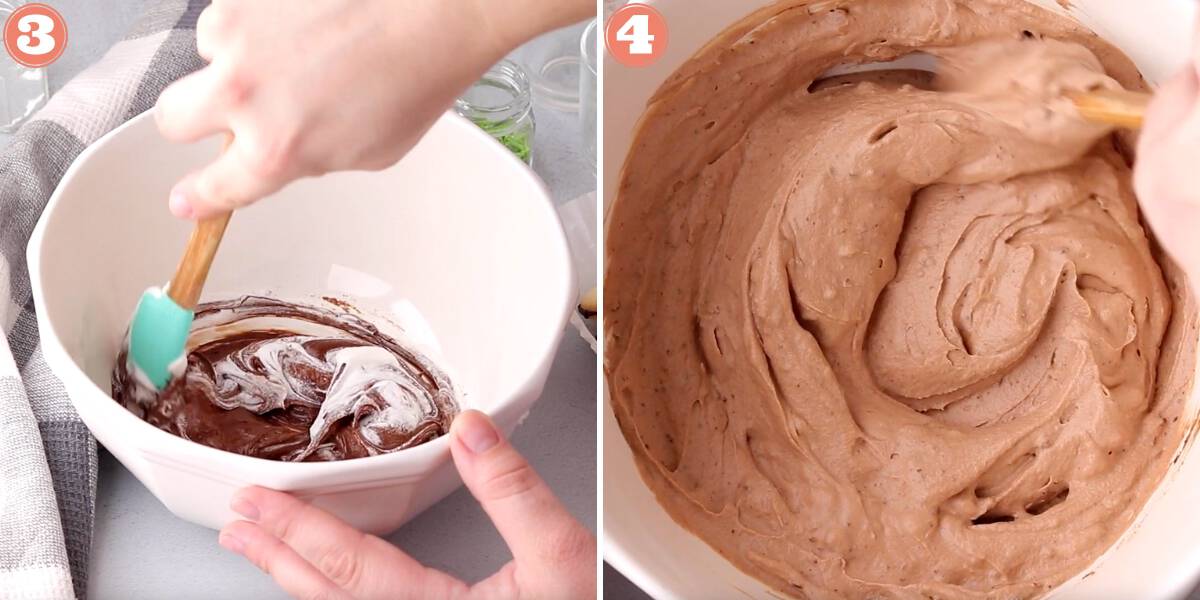
Gently fold in 1 scoop of whipped cream in the melted chocolate chips. Repeat this step, one scoop at a time, till all the whipped cream is nicely folded into the mousse, giving it an even milk chocolate color. (pic 3 & 4)
For easy assembling, using a spatula transfer the mousse in a piping bag or a gallon-size ziplock bag. Seal the bag and push all the mousse to one corner, making a cone shape. Refrigerate till you gather the topping and decoration.
Prepare the Decorations
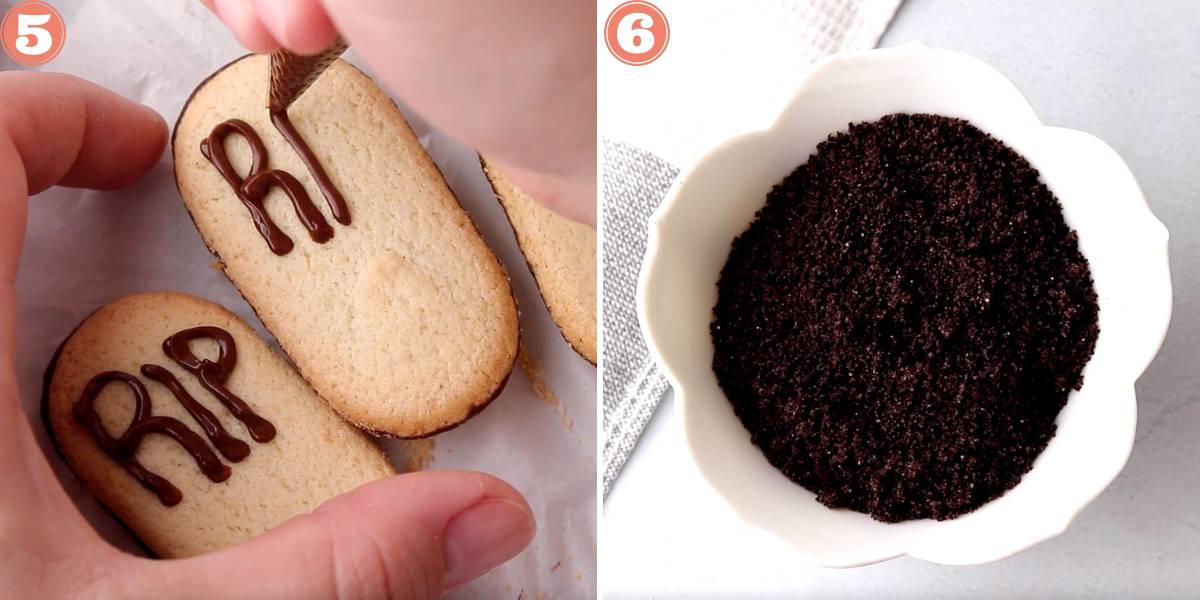
Melt the remaining chocolate, cool for 5 minutes, and transfer the chocolate to a sandwich-size ziplock bag, or a small piping bag, and cut a small hole in it.
Note: You will use this to pipe the letters, RIP, on the 'gravestone'(Milano cookie), so make sure that the hole is very small, or it will get messy.
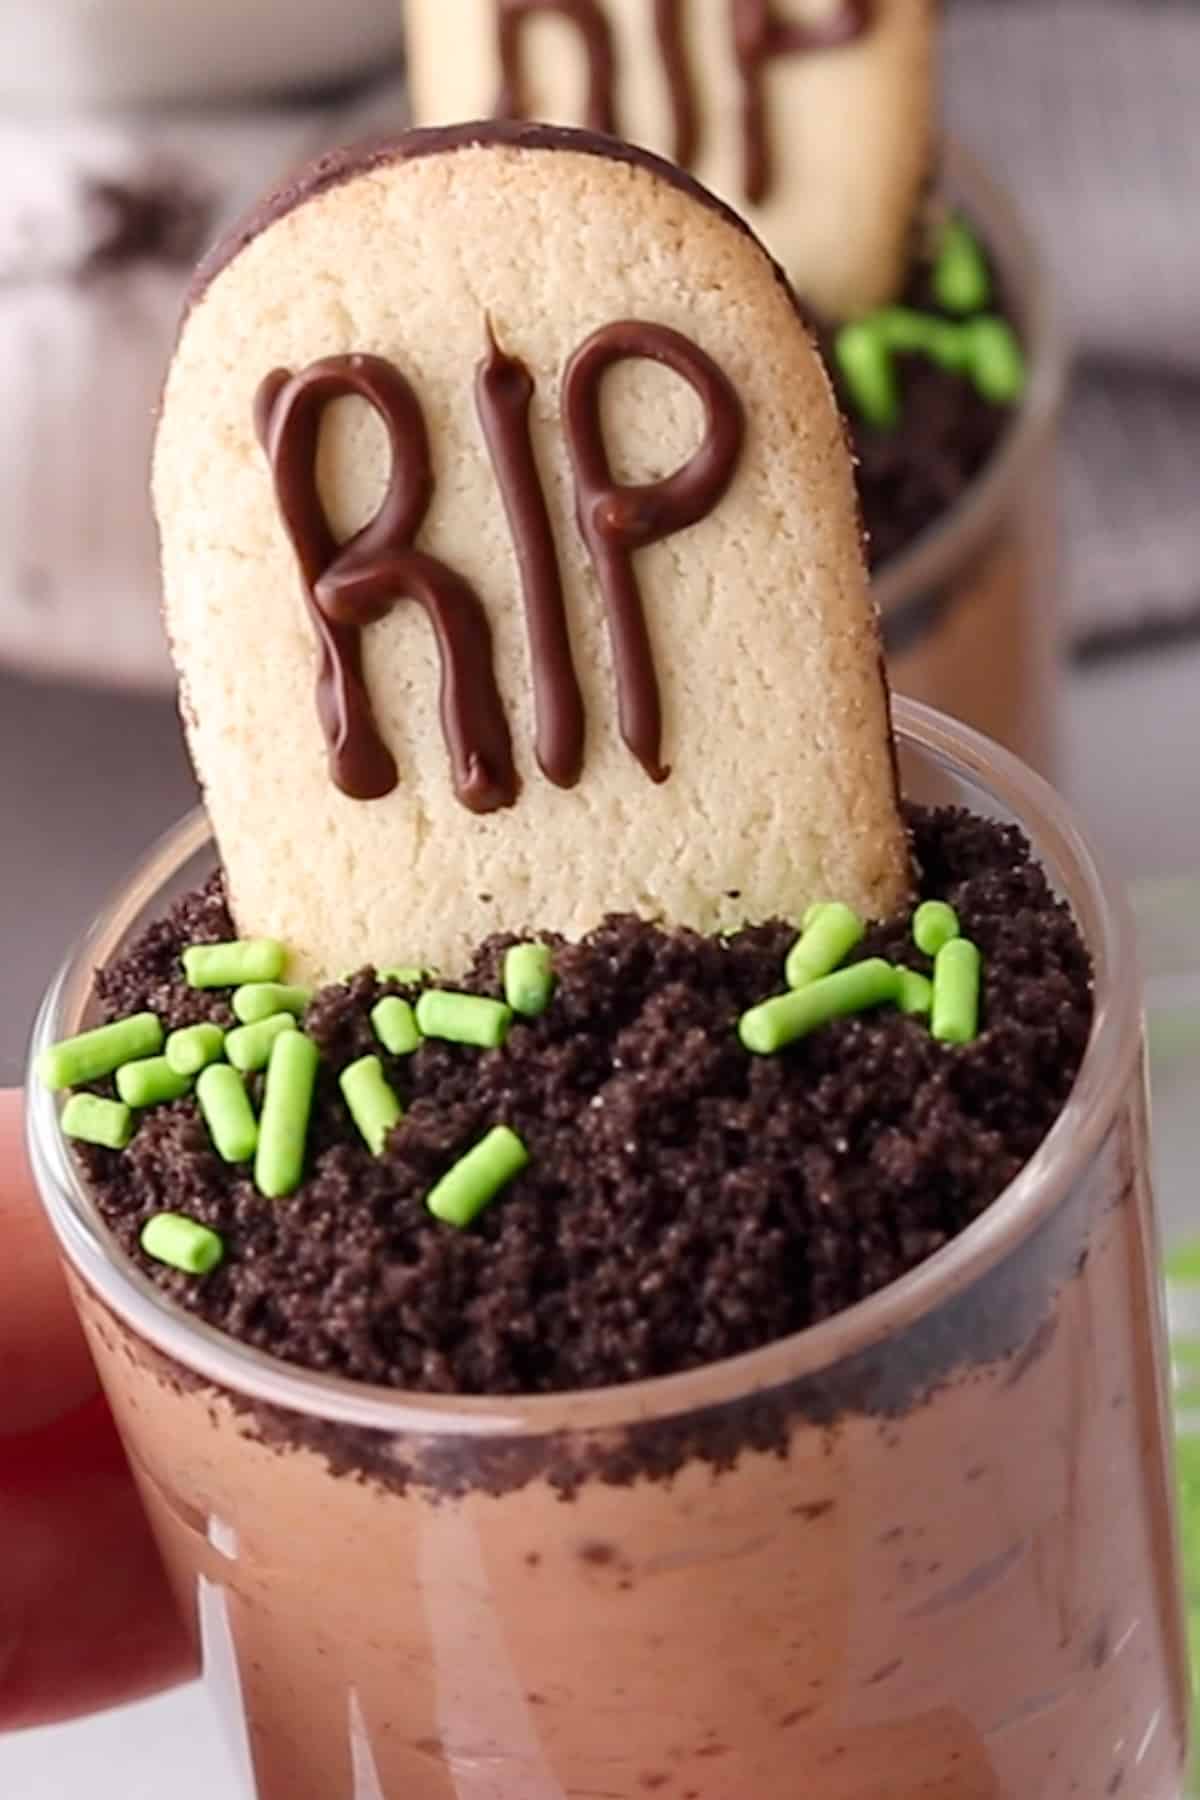
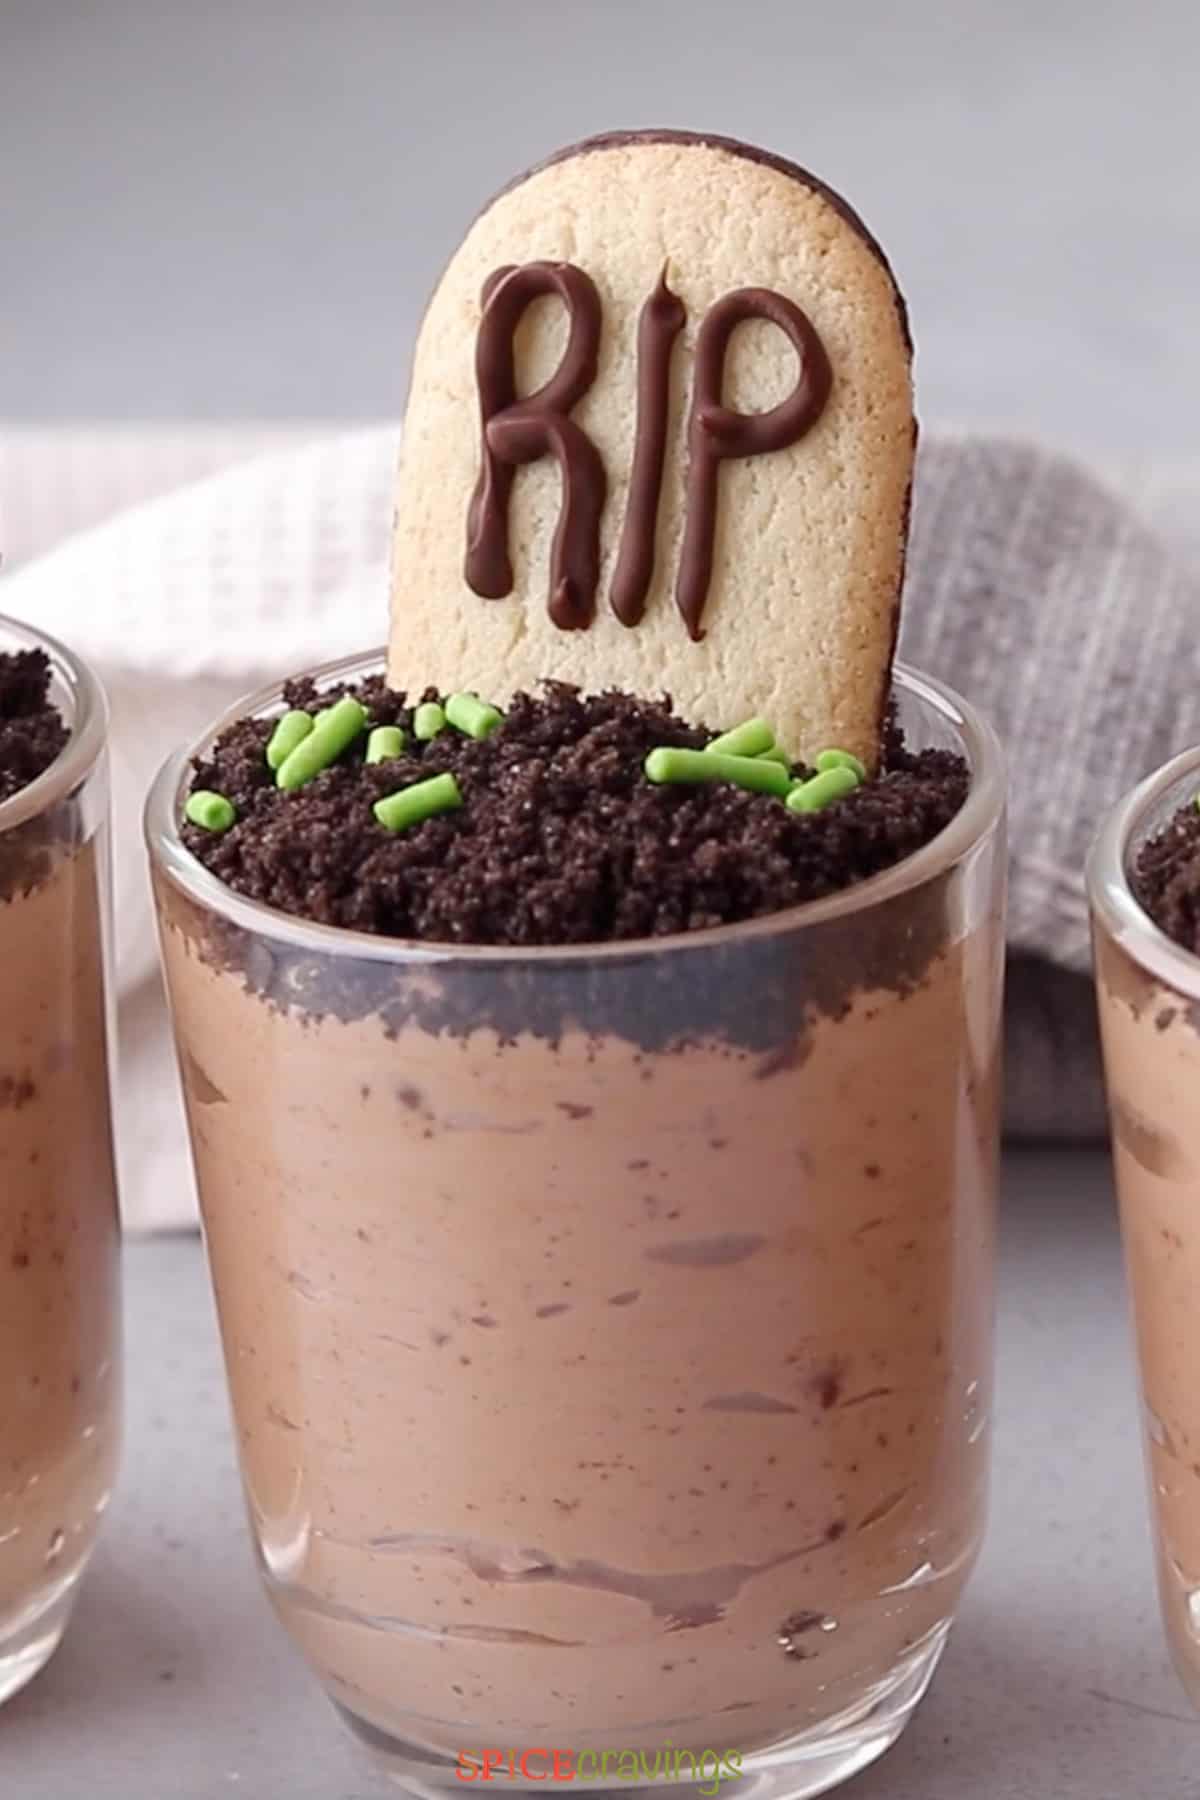
Gravestones: Now comes the fun part! Take a Milano cookie and slowly pipe the words "RIP" on the top half. Set aside for setting. You can also pop them in the refrigerator. The gravestones are ready. (pic 5)
Dirt: Pulse Chocolate Oreo cookies in a small food processor, or crush them in a large ziplock bag with the back of a skillet, until it reaches desired "dirt-like" consistency. (pic 6)
Assemble Chocolate Mousse Graveyards
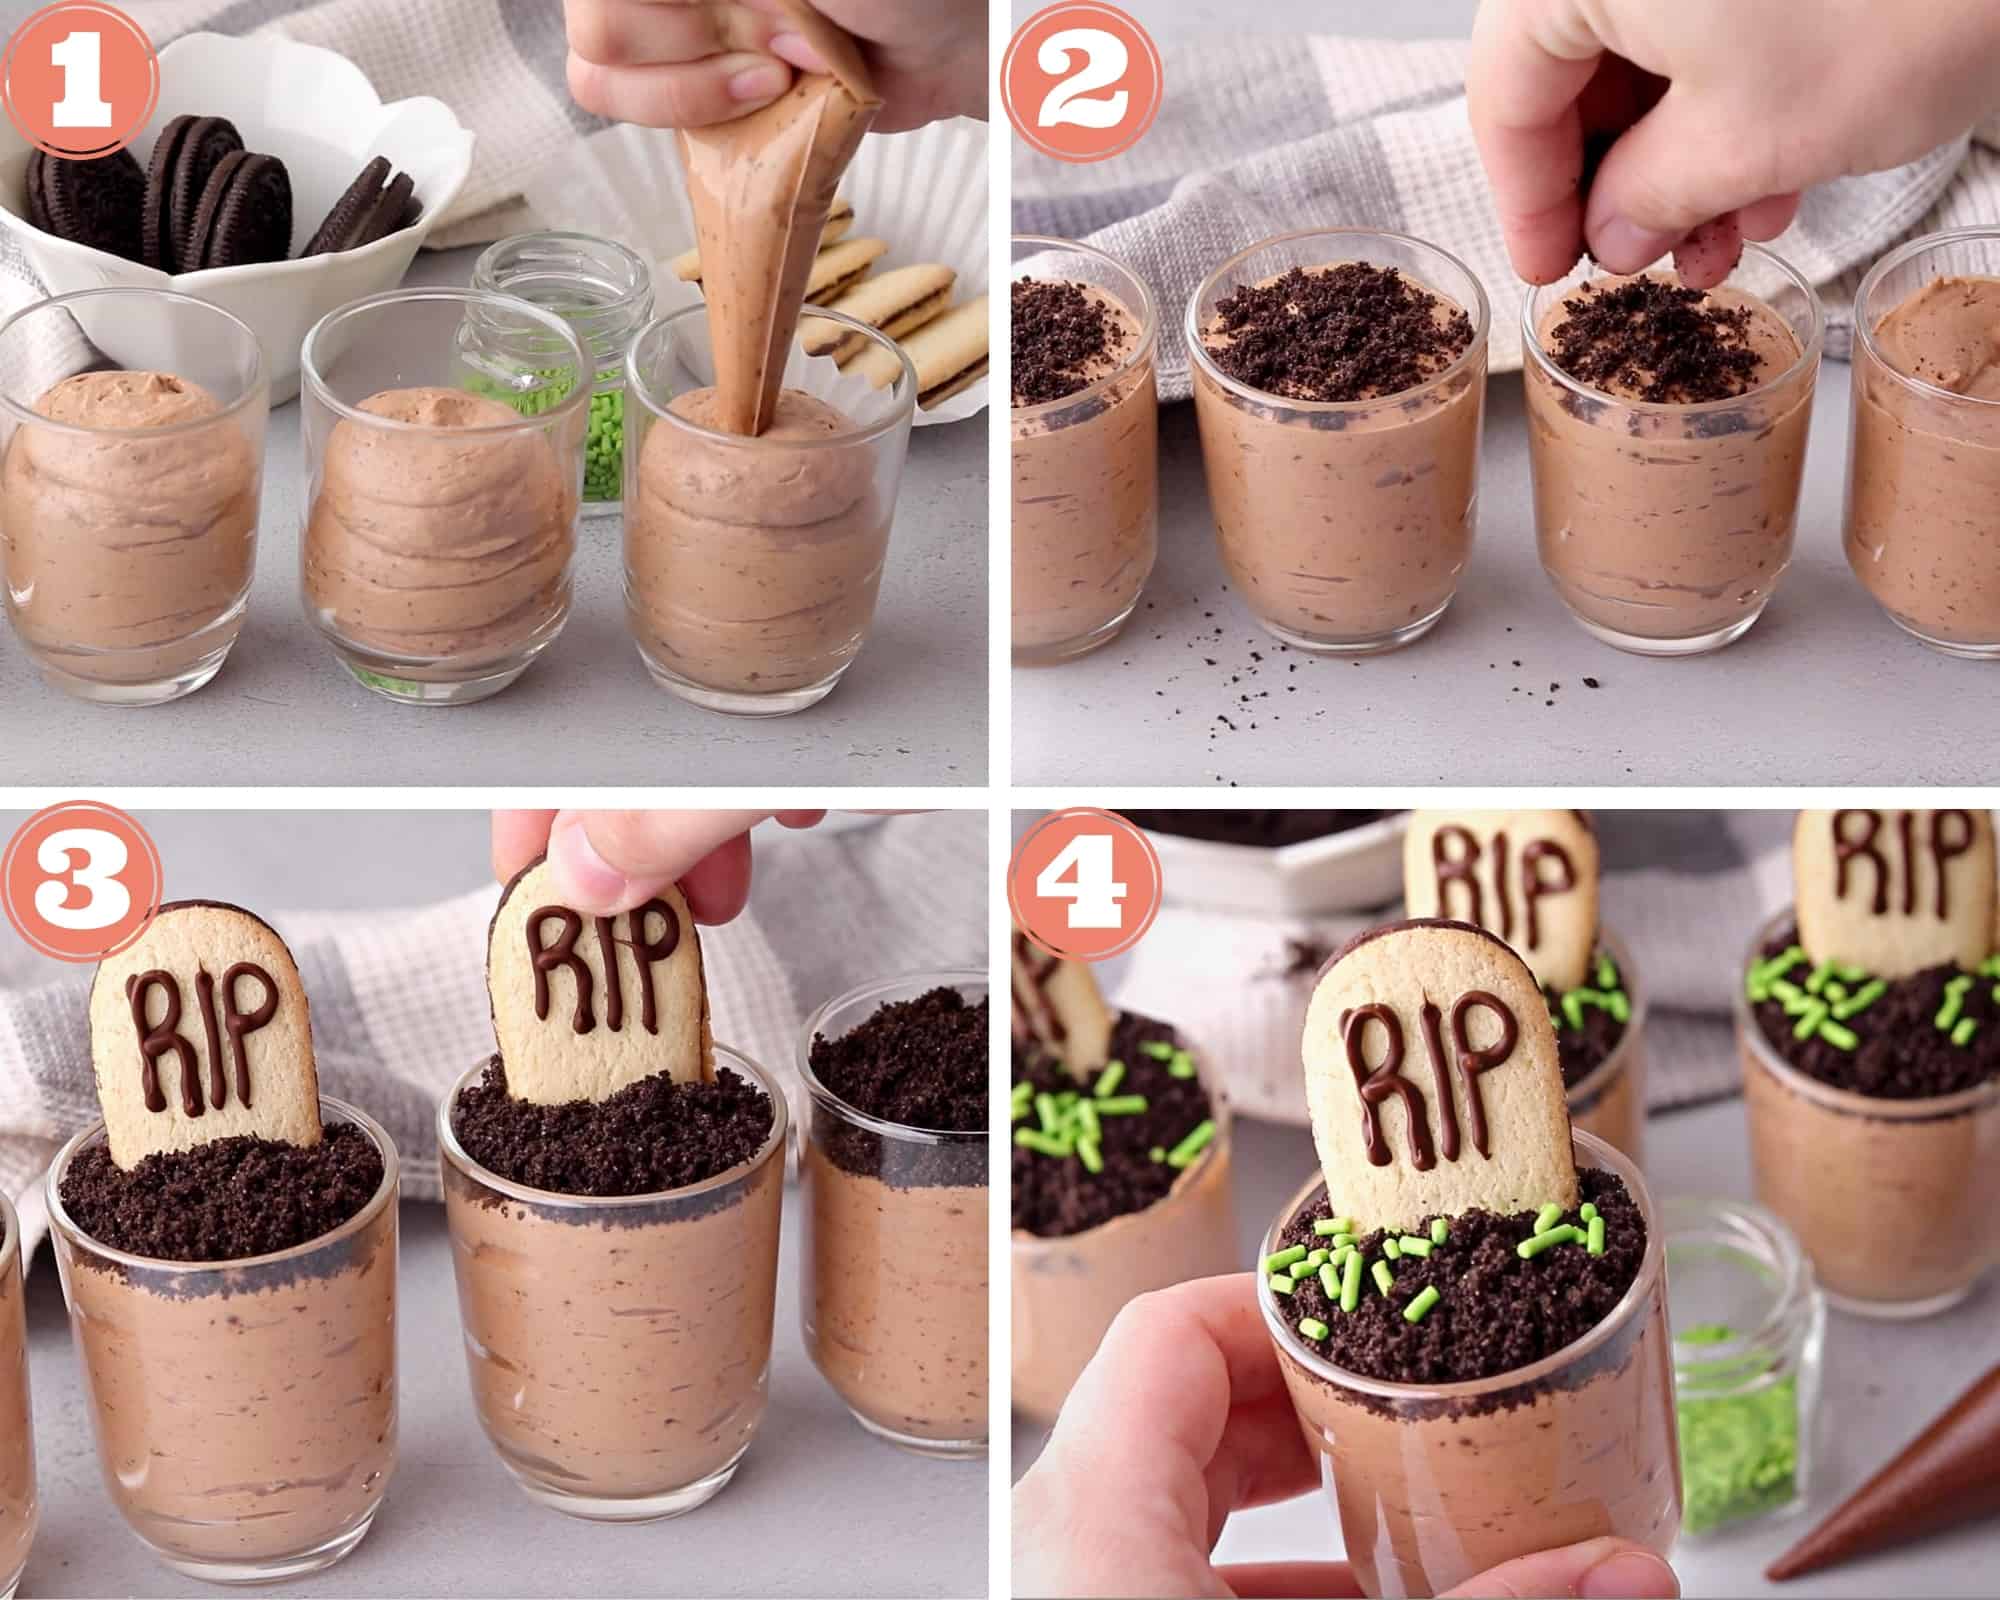
Cut ½ inch at the tip and pipe the mousse in small shooter glasses or serving cups, leaving enough room for the decoration. (pic 1)
Take a mousse cup and top the mousse with the Oreo dirt. (pic 2)
Then, insert one gravestone Milano cookie per glass, at an angle, about ½ way in. Make sure that a good portion of the cookie is still sticking out, and that the 'RIP' is very visible. (pic 3)
Top with green sprinkles as grass, just as shown in the picture below. Your Chocolate Mousse Graveyards are ready. (pic 4)
Serving Suggestions
My girls got the inspiration of making these chocolate mousse graveyards in individual shot glasses, and use Milano cookies as the tombstone. It not only looks great but also works out to be very convenient since you don't need any plates to serve it in.
Alternate assembling: Serve it casserole-style: For a larger quantity, you can assemble this casserole-style. Assemble this dessert in a large shallow glass tray for people to help themselves.

Recipe Tips & Notes
- If making this dessert in individual portions, assemble them in shot glasses or small dessert cups. It not only looks great but also works out to be very convenient since you don't need any plates to serve it in.
- For a larger quantity, you can assemble this casserole-style. Multiply the recipe accordingly and assemble the mousse graveyards in a large shallow glass tray.
- For a smaller quantity, I have found the electric hand mixer to be more effective than a stand-alone mixer.
- This dessert can be made a day ahead of your Halloween party. Prepare and pipe the mousse in shot glasses or cups, and chill overnight in the refrigerator. Assemble the dirt and tombstone an hour before the party and stick them back in the refrigerator. Take the mousse cups out of the refrigerator 10-15 minutes before serving.
- When piping the letters, RIP, on the tombstone, make sure that the piping hole is very small, or it will get messy.
📖 Recipe

Chocolate Mousse Graveyards for Halloween
Want to save this recipe?
Ingredients
- ½ cup bittersweet chocolate chips + 2 tablespoon for piping
- 1 cup heavy cream
- 2 tablespoon confectioner's sugar
- 4-5 Crushed oreos
- 4 milano cookies
- 1 tablespoon Green sprinkles (optional)
Instructions
Melt the Chocolate Chips to a smooth consistency using Double Boiler or Microwave
- Double boiler method: Fill a tall pot about ¼ full with water and bring to a boil. Reduce the heat to a simmer. Reserve 2 tablespoon for later and add ½ cup chocolate chips to a smaller heat-safe bowl and fit in on TOP of the pot such that, there is at least 3″ space between the bowl and water. We used a 3qt Instant Pot for the base and used a glass bowl for melting the chips.
- Microwave method: Using 20 seconds increments, melt the chocolate chips in the microwave using the default heat setting. It takes about 40-60 seconds. Time may vary a bit depending on your microwave. Stir every 20 seconds.
Beat Heavy Cream
- While the chocolate cools, beat heavy whipping cream and confectioner's sugar, until it makes soft peaks. The time for this depends on quantity, kind of mixing gadget (stand mixer or electric mixer) and speed of mixing. The end result should resemble the consistency of a canned whipped cream.
Make the Mousse
- Gently fold in 1 scoop of whipped cream in the melted chocolate chips. Repeat this step, one scoop at a time, till all the whipped cream is nicely folded into the mousse, giving it a milk chocolate color evenly.
- For easy assembling, using a spatula transfer the mousse in a piping bag or a gallon size ziplock bag. Seal the bag and push all the mousse to one corner, making a cone shape. Cut ½ inch at the tip and pipe the mousse in small shooter glasses or serving cups, leaving enough room for decoration.
- Refrigerate till you assemble on the topping and decoration. If you are making it ahead of time, take the mousse cups out of the refrigerator 10-15 minutes in advance, so that it can soften slightly.
Topping & Graveyard Decoration
- Melt remaining chocolate, cool for 5 minutes and transfer the chocolate in a sandwich size ziplock bag, or a small piping bag. You will use this to pipe the letters on the 'gravestone'(Milano cookie), so make sure that the hole is very small, or it will get messy.
- Now comes the fun part! Take a Milano cookie and slowly pipe the words "RIP" on the top half. Set aside for setting. You can also pop them in the refrigerator. These are your gravestones.
- Pulse the Oreos in a small food processor, or crush them in a large ziplock bag with the back of a skillet, until it reaches desired "dirt-like" consistency.
- Top the mousse with the oreo dirt. Insert one gravestone Milano cookie per glass, at an angle, about ½ way in. Make sure that a good portion of the cookie is still sticking out, and that the 'RIP' is very visible. Top with green sprinkles as grass, if desired. Your graveyard Chocolate Mousse is ready! Enjoy!
Notes
- If making this dessert as individual portions, assemble them in shot glasses or small dessert cups. It not only looks great, but also works out to be very convenient since you don't need any plates to serve it in.
- If you are feeding a large crowd, you can just make a big batch of this mousse and assemble it in a large shallow glass tray for people to help themselves.
- For a smaller quantity, I have found the electric hand-mixer to be more effective then a stand-alone mixer.
- This dessert can be made a day ahead of your halloween party. Prepare and pipe the mousse in shot glasses or cups, and chill overnight in the refrigerator. Assemble the dirt and tombstone an hour before the party and stick them back in the refrigerator. Take the mousse cups out of the refrigerator 10-15 minutes before serving.
- When piping the letters, RIP, on the tombstone, make sure that the piping hole is very small, or it will get messy.


Leave a Reply