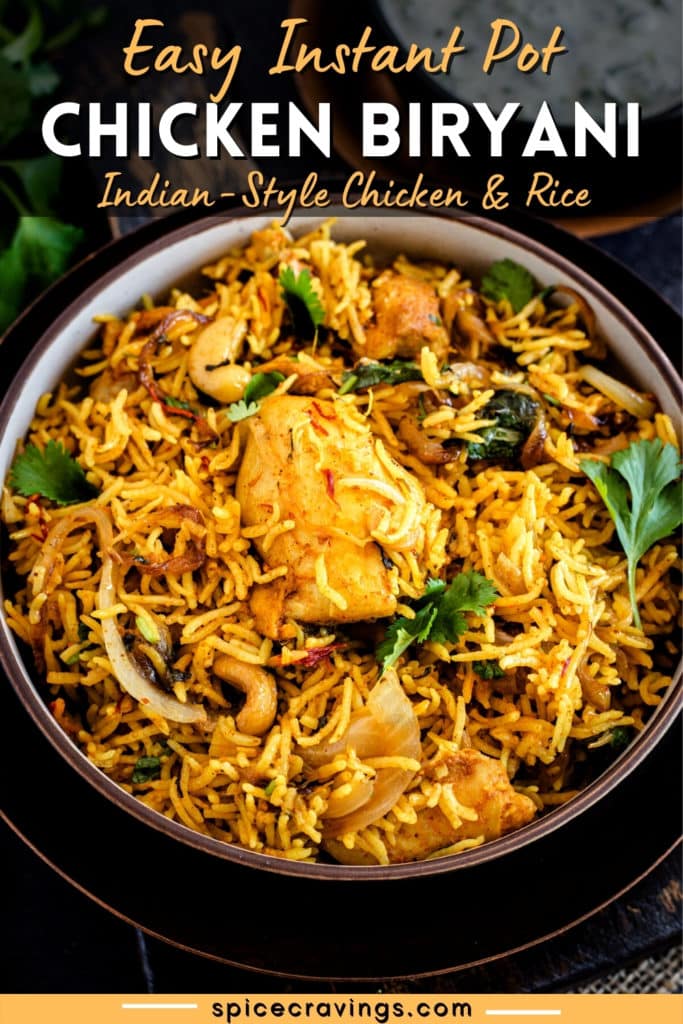
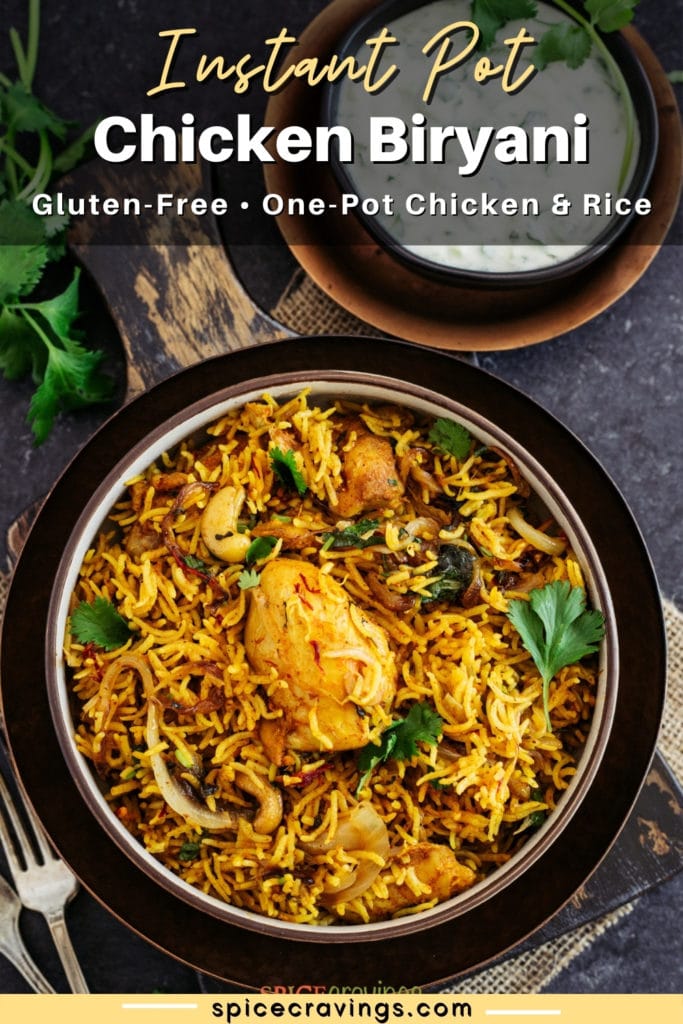
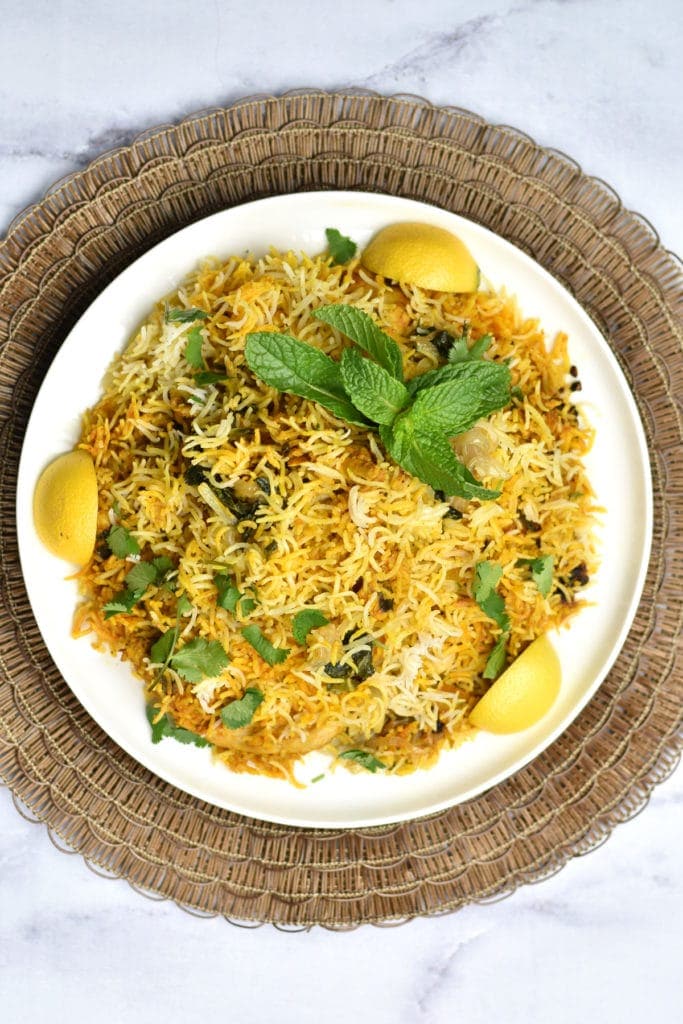
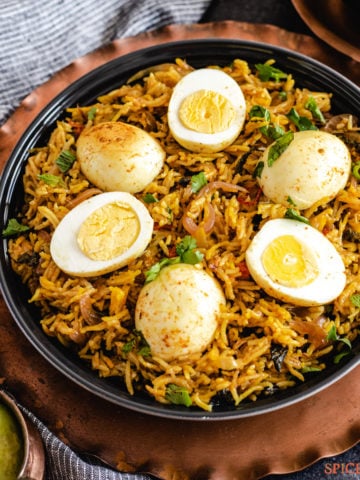
This aromatic Instant Pot Chicken Biryani is a simplified one-pot recipe for a classic Indian chicken and rice dish. In this easy recipe, marinated chicken is steam-cooked with nutty basmati rice and is flavored with fresh herbs, caramelized onions, fragrant spices, and saffron. Enjoy this restaurant favorite even on weeknights, in less than an hour.

Want to save this recipe?
Chicken biryani is my kid's favorite Indian rice dish and for a good reason! It's a comforting and delicious one-pot meal with fall-apart tender chicken, fluffy long-grain basmati rice, and sweet caramelized onions (can't go wrong with that combination- right!). My family loves it with a side of cucumber raita and a simple salad!
Jump to:
Why this will become your 'go-to' Instant Pot Biryani?
It's a complete one-pot meal! Traditionally, biryani is a complex recipe with multiple steps (and dishes) involved. In this simplified and easy recipe for Instant Pot Chicken Biryani, I show you how to create authentic dum biryani flavors using an Instant Pot, all in the same pot.
Biryani is ready in less than an hour, most of which is hands-off cooking time. In this post, I've included two ways of making biryani- one with partially cooked rice, and another with uncooked rice (my favorite way), and both are done in under an hour, including time to marinate the chicken. So let's get started!
Jump to:
What is Biryani?
Biryani is a popular layered rice dish from the Indian subcontinent. Originally it was made with layers of marinated meat and basmati rice, topped with caramelized onions, saffron, nuts, and herbs, and then steam-cooked until tender and fragrant. But nowadays, you can find variations that include eggs, paneer, and vegetables as well.
Origin of Biryani: According to historians, biryani was first invented in Persia and was brought to India by the Mughals. It first appeared in the north, mainly in Delhi, Rampur, and Lucknow, and gradually made its way to the south, to Hyderabad, Tamil Nadu, Kerala, and Karnataka.
The ingredients and proteins vary depending on the region. Some popular variations include Hyderabadi Biryani, Sindhi Biryani, Lucknowi Biryani, Calcutta Biryani, Malabar Biryani, and Mughlai Biryani, just to name a few. Here's a detailed article on Sukhi's Indian Cuisine, that explains the origin of Biryani and the different Biryani variations throughout India.
There are primarily two styles of cooking biryani:
- Kachhi Biryani- Kachhi means 'raw'. In this dish, raw marinated meat is cooked with raw or partially cooked rice along with flavorings.
- Pukki Biryani- Pukki means 'cooked'. Here the meat is cooked first, then rice is added along with flavorings and cooked together.
Today, we're cooking a Mughlai-inspired 'Kachhi biryani' and using the Instant Pot to mimic the classic style of steam cooking biryani, called 'Dum'.
Love Biryani? Try these other popular biryani recipes on the blog- Egg Biryani, Lamb Biryani, Vegetable Biryani, Achari Paneer Biryani.
Ingredients- Notes & Substitutions
In addition to ghee (or oil), ginger-garlic paste, freshly chopped cilantro and mint, here's what you need to make this aromatic and delicious Chicken Biryani in the Instant Pot. You can also use a few optional toppings, like cashews and hard boiled eggs to finish the dish.
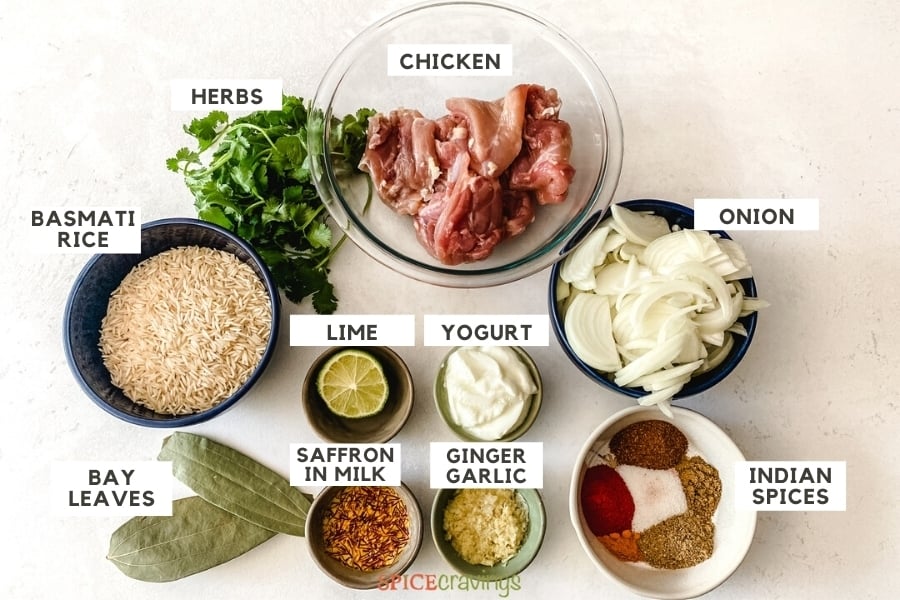
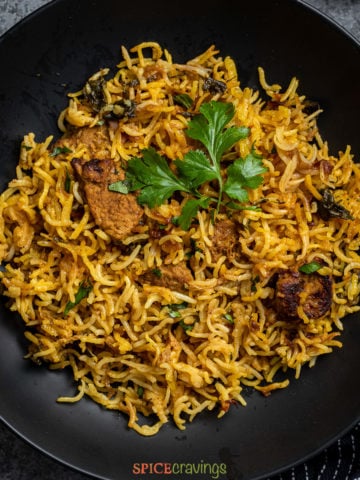
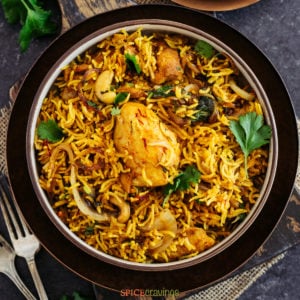
- Chicken: I've used boneless skinless chicken thighs in this recipe for maximum flavor and convenience. Alternatively, you can use skinless 'bone-in' chicken thighs or legs. Check the notes below for recipe adjustment.
- Rice: Long grain basmati rice is key to a good biryani. I prefer Kohinoor extra-large basmati, but you can look for alternate high quality brands, like 24 Mantra.
- Marinade: I make this classic marinade with plain yogurt (2% or whole) and homemade garam masala. You can use also use high quality brands like 24 Mantra or Everest. If using plain greek yogurt instead, reduce a tablespoon.
- Onions: It won't be biryani without caramelized onions. You can use any onion of choice. Checkout the detailed make-ahead instructions below to save time on this ingredient. Alternatively, use store-bought fried onions.
How to Make Chicken Biryani
Here's how I make Chicken Biryani in Instant Pot with uncooked rice in less than an hour, from start to finish. (Instructions for partially cooked rice are included below).
Prepare Ingredients
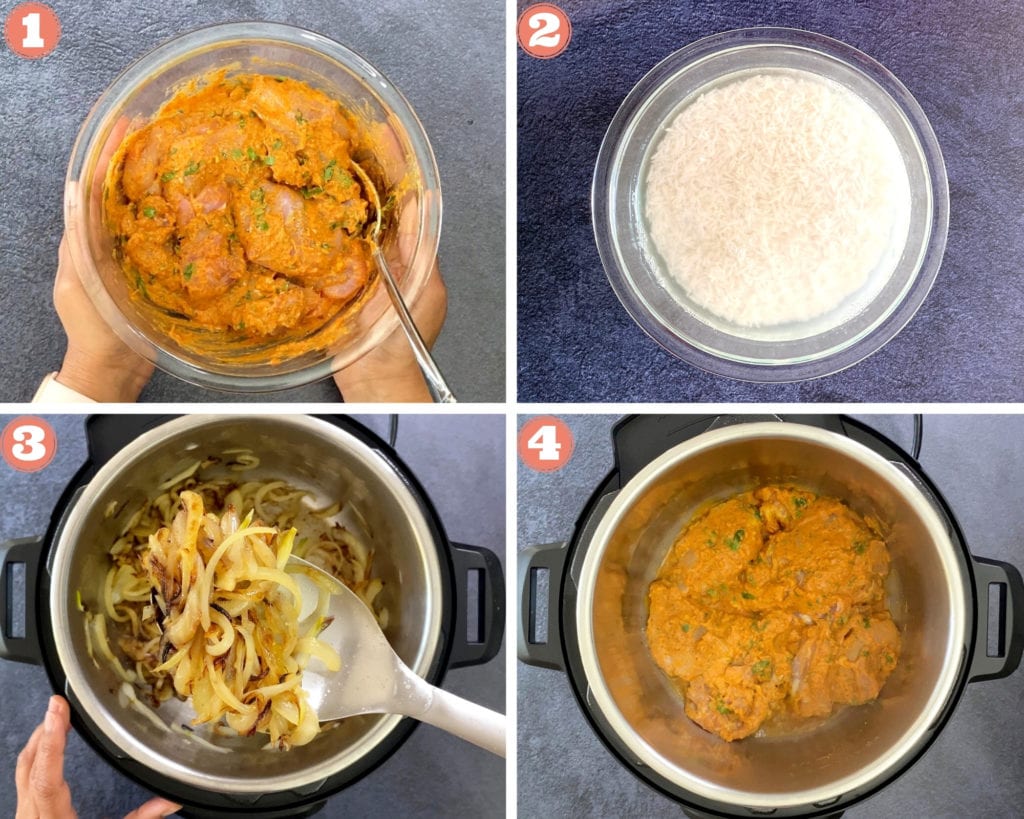
- Step 1- Marinate chicken: In a large mixing bowl combine ingredients listed under 'marinade'. Toss chicken in it and refrigerate anywhere from 30 minutes to overnight.
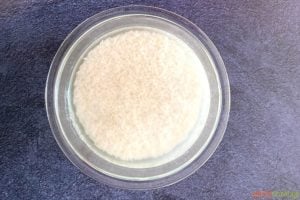
- Step 2- Soak rice: Rinse long grain basmati rice 2-3 times until the water runs clear. Soak it in enough water for about 15 minutes while you prepare other ingredients.
- Step 3- Caramelize onions: To make fried onions from scratch, heat the Instant pot on Saute, adjusted to high setting. Add ghee and sliced onions along with a pinch of salt. Continue to saute, stirring occasionally, until the onions turn golden brown in color. It can take 12-15 minutes for that. Deglaze the pot after that.
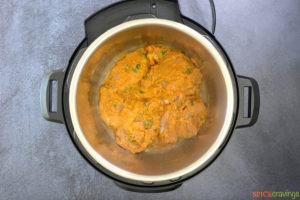
- Step 4- Saute Chicken: Add 2 tablespoons oil along with marinated chicken. Spread it in a single layer, cover with a glass lid and cook for 3 minutes. Open the lid, flip the chicken and turn off Saute mode. Add a couple of tablespoons of water and scrape off any bits stuck to the bottom of the pot.
Important Deglazing Tip: Be sure to deglaze the pot after browning onions. Add ¼ cup water and scrape off any brown bits stuck to the bottom. This prevents the "Burn" message. If needed, clean the pot.
Assemble & Pressure Cook
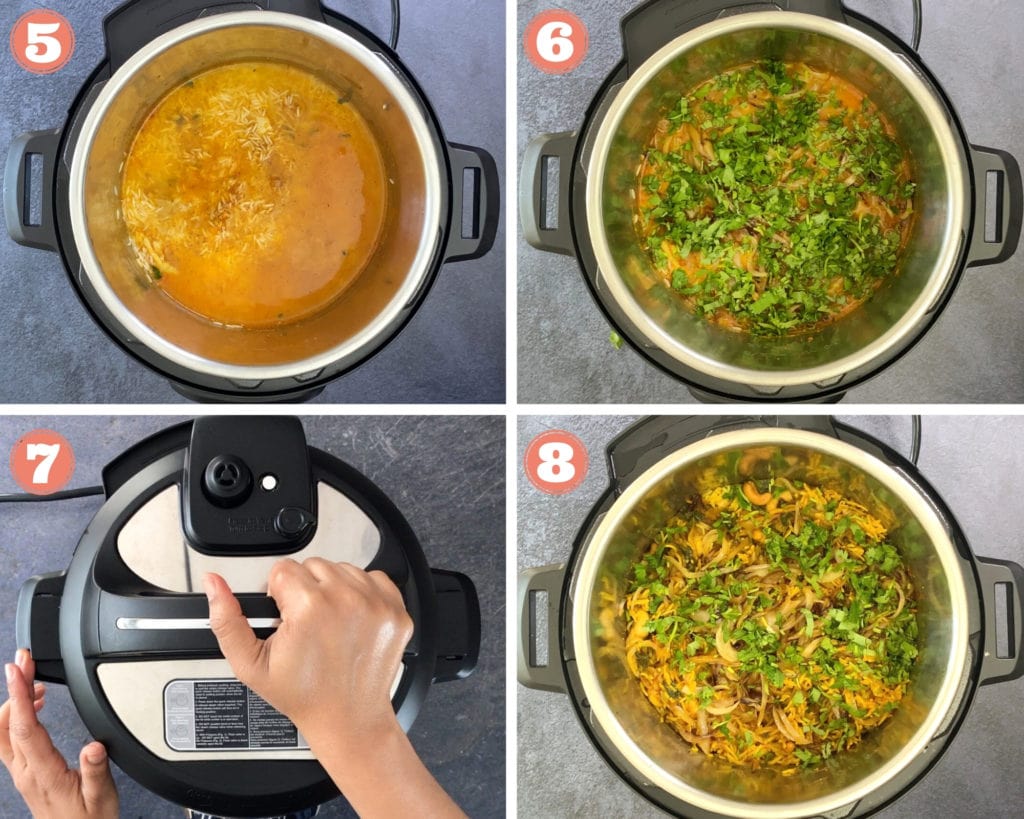
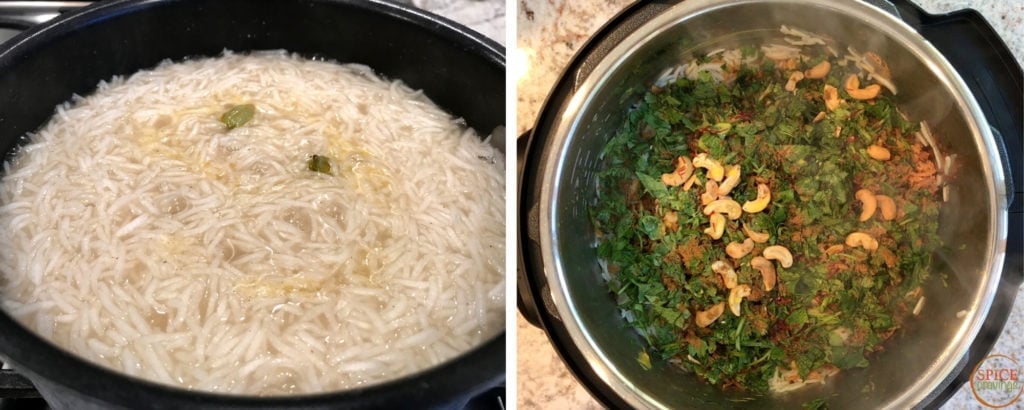
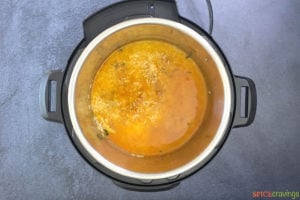
- Step 5- Layer Biryani: To layer biryani in the Instant pot, layer and spread the strained rice over the partially cooked chicken. Add water over rice (follow a 1:1 ratio). Make sure all the rice is submerged. Sprinkle salt and garam masala and gently stir the top only.
- Step 6- Top with aromatics: Top with half the fried onions and herbs, along with soaked saffron.
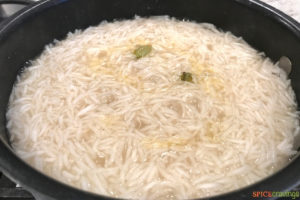
- Step 7- Pressure cook: Close the lid with knob at sealing position. Set Pressure Cook or Manual for 6 minutes at high pressure. After cooking time is up, wait 5 minutes then manually release the pressure following the quick release (QR) instructions of your cooker.
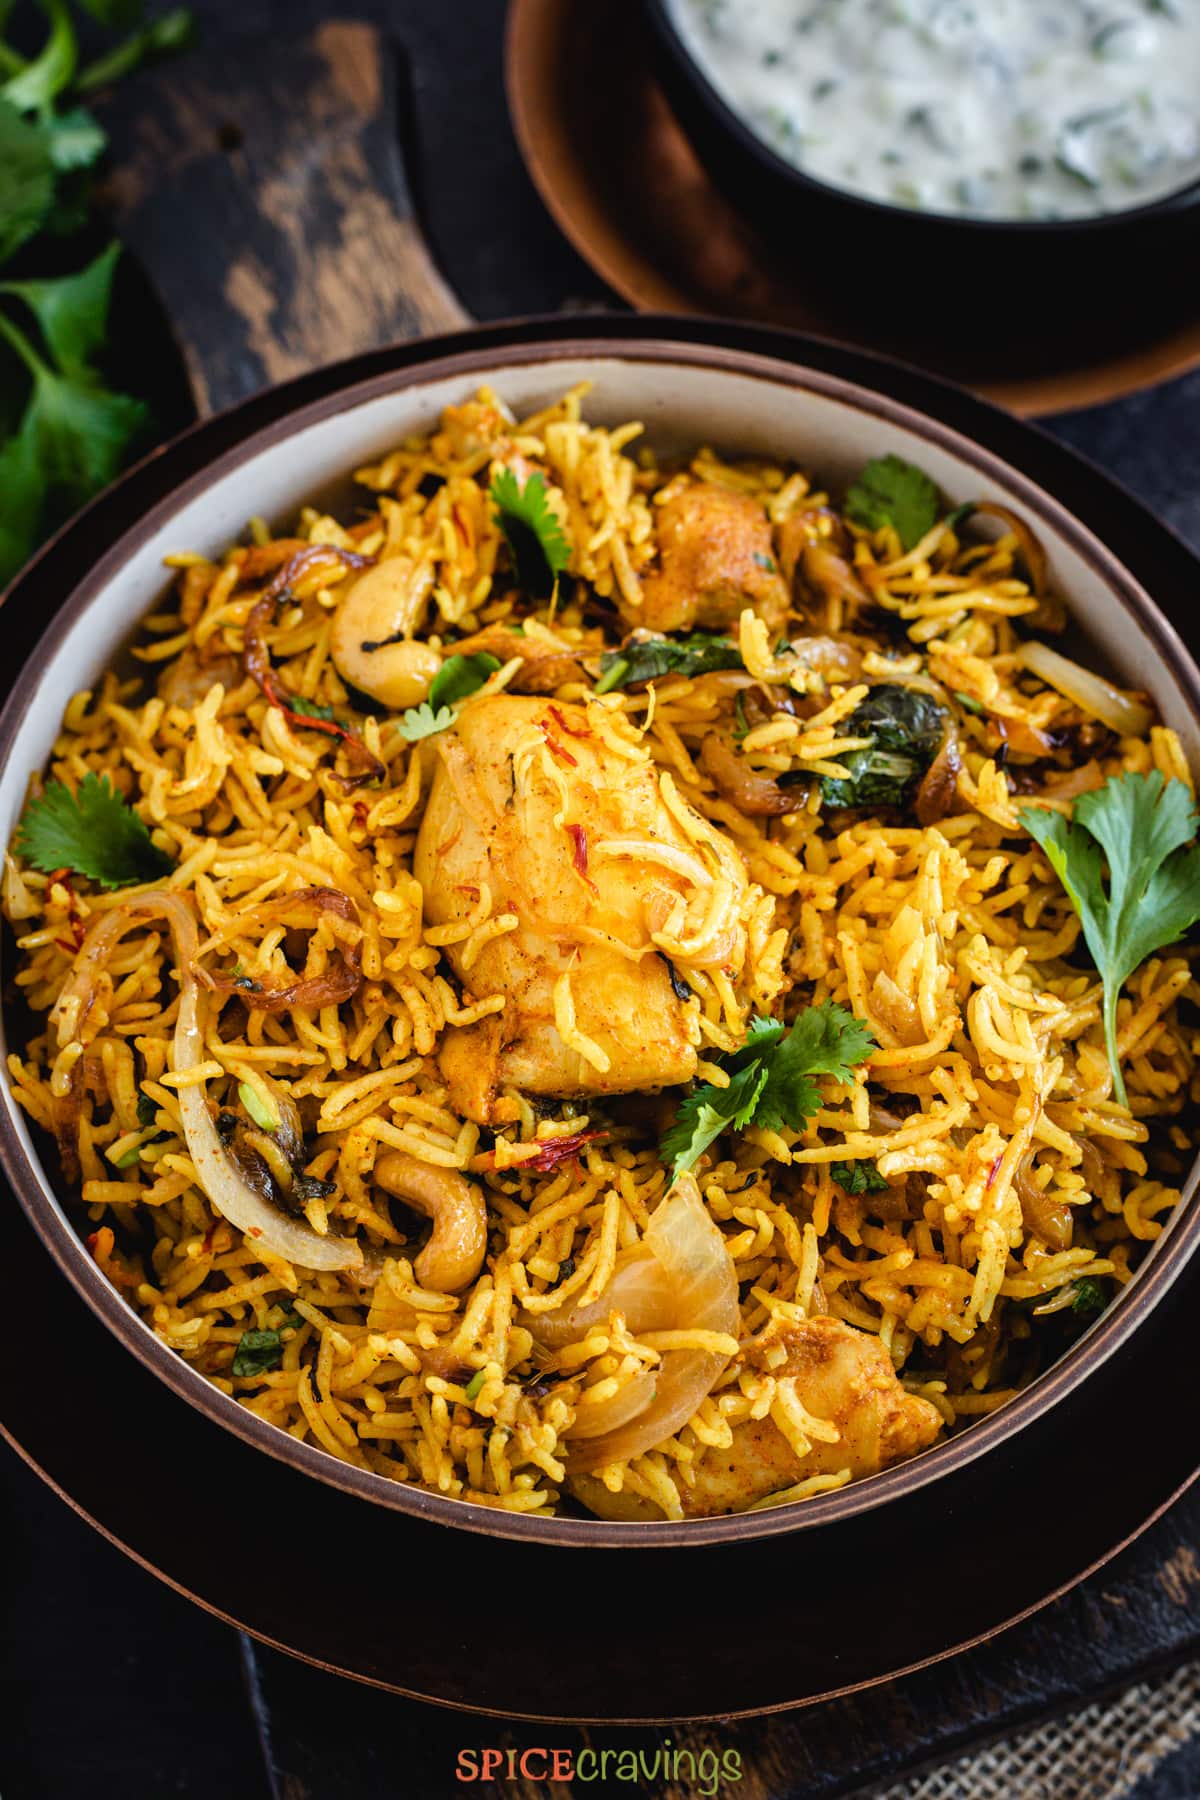
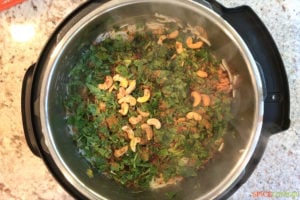
- Step 8 - Garnish & Rest Biryani: Open the lid and using oven mitts remove the inner pot from the Instant Pot base, to stop the cooking process. Using a fork, gently fluff the top 1-inch layer of rice. Top with remaining fried onions and chopped herbs. Let it rest for 5 minutes, uncovered. This allows for any excess moisture to evaporate. When ready to serve, carefully fluff up the biryani with a fork, without breaking the rice.
How to Make Chicken Biryani with Partially Cooked Rice
- Follow steps 1-4 for marinating chicken, soaking rice, caramelizing onions and sautéing onions. While the onions are sautéing, make rice following the instructions below.
- To partially cook rice, add drained rice to a microwave safe bowl, along with with water and salt. Microwave for 5 minutes, or until the rice is 50% done, and then strain any leftover water. Alternatively, boil 4 cups of water in a sauce pan, add rice, salt, garam masala and ghee/oil. Bring back to a boil and cook rice on high-heat for 5 minutes, then strain.
- Layer the biryani as per steps 5 & 6 and pour ½ cup water over the rice. Pressure cook and serve as per step 7 & 8.
Serving Suggestion- Make a Meal
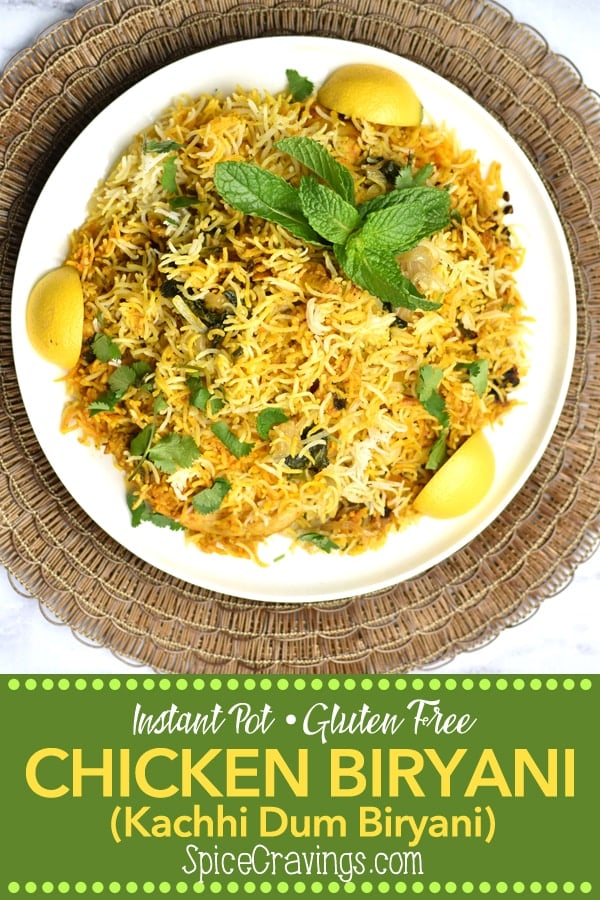
I like to serve Chicken biryani warm, with a side of Cucumber Raita (cucumber-yogurt dip) and a simple cucumber-tomato-onion salad, or garden salad, drizzled with fresh lime vinaigrette.
Toasted papad is another popular accompaniment with Biryani.
How to Double This Recipe
Multiplying this recipe is easy. To double up this recipe, I create alternate layers of chicken and rice, basically repeating step 5 in the order mentioned. You can easily double this recipe in a 6qt and 8qt Instant Pot.
How to Make Chicken Biryani in a Stovetop Pressure Cooker
Here's how to make this recipe in a stove top pressure cooker:
- Follow all instructions and assemble the biryani in the pressure cooker. Close the cooker and place it on medium-high heat.
- As soon as the first whistle goes, reduce heat to medium. Place a flat skillet(frying pan) on the stove and place the pressure cooker on top of that. This will ensure that your chicken doesn't burn at the bottom of your pressure cooker. Continue cooking on medium-high heat for 6 minutes.
Tips for Making Fried Onions
Fried onions are a huge contributor of flavor in any Biryani. When I'm short on time, I use store-bought fried onions from Trader Joe's, and those work great for Biryani. Making them at home takes a bit of time, so I like to plan ahead when I can.
I prepare them in the oven, cool and store them in an air tight container in the fridge (or freeze) for later use. Here's how to make them:
Fried Onions in the Oven: Thinly slice 2 medium onions (red, yellow or white). Toss with melted ghee or oil along with ½ teaspoon salt. Spread on a baking sheet and cook in a pre-heated oven at 425°F for about 22-25 minutes, until they are golden brown. Flip them half way through.
Recipe Tips & Notes
- Rice: For best results choose a high quality, long-grain variety of basmati rice. I personally prefer Kohinoor Extra-Long Basmati for this recipe.
- Chicken: If you like to use skinless 'bone-in' chicken (thighs or drums) in this recipe, skip saute and pressure cook chicken with ¼ cup water, for 5 minutes at high pressure, followed by a quick pressure release. After that, layer rice as per instructions and pressure cook again.
- Marination: Marinating chicken for just 30 minutes makes a big difference in flavor and tenderness. Try not to skip that step.
- Order of steps: If you follow the directions in order- Marinate chicken, soak rice, caramelize onions, saute chicken, pressure cook biryani, this recipes comes together in an hour.
- How to prevent the 'Burn' Message: Deglaze the pot after caramelizing and sautéing. Brown bits stuck at the bottom can cause the burn sign, so be sure to remove those. If needed, clean the pot in between steps.
- Fried Onions shortcut: Caramelizing onions takes about 13-15 minutes. You can fry them a few days in advance, or use store-bought fried onions, to save on that time.
FAQs
If your Instant pot beeps in a repetitive chime and displays 'Burn', you have cancel the cooking process, release the pressure, open lid, remove the chicken and rice, clean the pot and start over again.
The top layer of rice may look undercooked, but that's normal. Which is why I suggest to fluff up the top 1-inch of the rice and mix it with the rest, and rest it for 5 minutes. This makes that top layer moist and soft.
Yes, that's what we do in this recipe. As long as you follow the cooking times of the different cuts of chicken, it is a fantastic way to cook tender and moist chicken.
Absolutely! This recipe is a perfect example of that. Another such recipe is the lamb biryani.
More Biryani Recipes
📖 Recipe
Instant Pot Chicken Biryani
Want to save this recipe?
Video
Equipment
Ingredients
MARINADE for CHICKEN:
- 3 tablespoons plain yogurt
- 1 tablespoons ginger-garlic paste homemade paste or grind ½-inch ginger + 3 cloves garlic
- 2 tablespoons chopped cilantro & mint ( or only cilantro)
- 1½ teaspoons garam masala
- 1½ teaspoons coriander powder
- ½ teaspoon cumin powder
- ¼ teaspoon turmeric
- 1½ teaspoons Kashmiri Red Chili Powder or paprika (regular)
- 1¼ teaspoon salt
- 1 tablespoon lime juice about ½ lime
- 1-1¼ pounds boneless skinless chicken thighs see notes for substitutions
FRIED ONIONS(If making your own)
- 2 medium onions -red/ yellow/ white, thinly sliced
- 2 tablespoons ghee for sautéing or avocado oil
- ¼ teaspoon salt
BIRYANI
- 2 tablespoons ghee homemade ghee or olive oil
- 2 bay leaves
- 10 whole cashews (optional)
- 1 teaspoon saffron soaked in 1 tablespoon warm milk
- ½ cup chopped cilantro & mint
- 1¼ cups long grain basmati rice rinsed & soaked for 15 minutes
- ¾ teaspoon salt
- ½ teaspoon garam masala
- 1¼ cup water + ½ cup for deglazing in between
Instructions
Instant Pot Chicken Biryani (with Uncooked Rice)
- In a large mixing bowl combine the ingredients listed under 'marinade'. Toss chicken in it and refrigerate anywhere from 30 minutes to overnight.

- Rinse long grain basmati rice 2-3 times until the water runs clear. Soak it in enough water for about 15 minutes while you prepare other ingredients.
- To make fried onions from scratch, heat the Instant pot on Saute, adjusted to high setting. Add ghee and sliced onions along with a pinch of salt. Continue to saute, stirring occasionally, until the onions get golden brown in color. It can take 12-15 minutes for that. Add ¼ cup water and scrape off any brown bits stuck to the bottom. If needed, clean the pot before the next step.
- Add 2 tablespoons ghee or oil along with marinated chicken. Spread it in a single layer, cover with a glass lid and cook for 3 minutes. Open the lid, flip the chicken and turn off Saute mode. Add few tablespoons water and scrape off any bits stuck to the bottom of the pot.
- To layer biryani in the Instant pot, layer and spread the strained rice over the partially cooked chicken. Add 1 cup water over rice (follow a 1:1 ratio). Make sure all the rice is submerged. Sprinkle salt and garam masala and gently stir the top only.
- Top with half the fried onions and herbs, along with soaked saffron.
- Close the lid with knob at sealing position. Set Pressure Cook or Manual for 6 minutes at high pressure. After cooking time is up, wait 5 minutes then manually release the pressure following the quick release (QR) instructions of your cooker.
- Open the lid and using oven mitts remove the inner pot from the Instant Pot base, to stop the cooking process. Using a fork, gently fluff the top 1-inch layer of rice. Top with remaining fried onions and chopped herbs, Let it rest for 5 minutes, uncovered. This allows for any excess moisture to evaporate.


Chicken Biryani with Partially Cooked Rice
- Follow steps 1-4 from above for marinating chicken, soaking rice, caramelizing onions and sautéing chicken. While the onions are sautéing, make rice following the instructions below.
- To partially cook rice on the stove, boil 4 cups of water in a sauce pan. Add drained rice and 1 teaspoon salt. Bring back to a boil and cook rice on high-heat for 5 minutes, then strain and keep aside. Microwave: Add drained rice to a microwave safe bowl, along with with 1½ cup fresh water and 1 teaspoon salt. Microwave for 5 minutes, or until the rice is 50% done, and then strain and keep aside.
- Layer the biryani as per steps 5 & 6 and pour ½ cup over the rice. Pressure cook and serve as per step 7 & 8.
Notes
- Rice: For best results choose a high quality, long-grain variety of basmati rice. I personally prefer Kohinoor Extra-Long Basmati for this recipe.
- Chicken: If you like to use skinless 'bone-in' chicken (thighs or drums) in this recipe, skip saute and pressure cook chicken with ¼ cup water, for 5 minutes at high pressure, followed by a quick pressure release. After that layer rice as per instructions and pressure cook again.
- Marination: Marinating chicken for just minutes really makes a big difference in flavor and tenderness. Try not to skip that step.
- Order of steps: If you follow the directions in order- Marinate chicken, soak rice, caramelize onions, saute chicken, pressure cook biryani, this recipes comes together in an hour.
- How to prevent the 'Burn' Message: Deglaze the pot after caramelizing and sautéing. Any brown bits left stuck at the bottom can cause the burn sign, so be sure to remove those. Clean the pot if needed in between steps.
- Fried Onions shortcut: Caramelizing onions takes about 13-15 minutes. You can fry them a few days in advance, or use store-bought fried onions, to save on that time.
- Recipe updated: This recipe has been updated with new photos, instructions and tips on how to avoid a burn message. It now includes two ways to make Instant Pot chicken biryani- with uncooked rice, as well as partially cooked rice.

Arti says
Loved it! Thanks for such an easy recipe.
Ushmaa says
I think my instant pot is too small it’s all the way to the top.
Aneesha says
Hi Ushmaa, yes, if it's filled all the way to the top, it's too small for the quantity listed. In general, never fill your instant pot past the "max line" and always account for food to expand. Hope this helps!
Toby says
I love the recipe and will make it this next week. One question: I want to use whole grain Basmati. This is for health reasons since whole grain rice has more nuteition and flavor. Should I just precook it until almost done and then put it in? Any tips?
Aneesha says
Hi Toby, It'll be hard to make this recipe using brown rice in the instant pot. I've tried it before and the results are not comparable. I'd recommend making it on the stove after par-cooking the brown rice.