


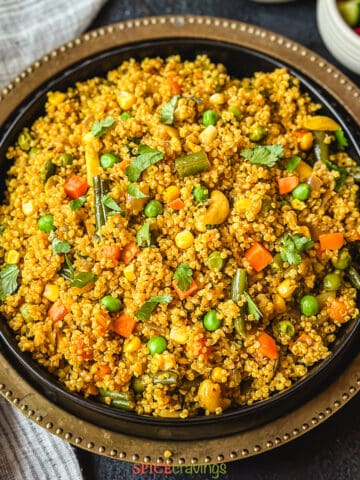
This Instant Pot Vegetable Biryani is a classic Indian dish made with a medley of vegetables, aromatic basmati rice, and yogurt, flavored with toasted garam masala, fresh herbs, and saffron. Enjoy a restaurant-style Biryani with a side of Boondi raita in just 40 minutes, thanks to this easy recipe.

Want to save this recipe?
Jump to:
What is Biryani
There are many theories about the origin of 'Biryani' (pronounced bee-riya-nee). It is believed to have originated in Persia and was brought to India by the Mughals around the 16th century.
The word Biryani is derived from the Persian word Beriyan, which means 'to fry or roast' before cooking, and Birinj, the Persian word for rice. So, one can say that Biryani is an Indian version of 'fried rice'.
Traditionally, Biryani is assembled with alternate layers of marinated vegetables (or meat) and long grain basmati rice, seasoned with biryani masala that includes garam masala, coriander, and cumin, almond other spices. It is topped with fried onions, fresh herbs, saffron, and ghee.
The cooking vessel is then sealed with wet dough, creating an airtight environment for cooking, called Dum. In this easy vegetable biryani recipe, I mimicked that 'Dum' cooking style in my Instant Pot, which uses a consistent medium heat to cook the rice and vegetables.

How to Make Instant Pot Vegetable Biryani
Thanks to the pressure cooker, you can make this restaurant-style biryani in just 40 minutes, most of which is hands-off cooking time. Let's take a look at what we need to make veg biryani.
Ingredients- Notes & Substitutions
Rice: Long-grain basmati rice is key to a good biryani. They get soft and fluffy after cooking and hold their shape really well. Look for this in an Indian store or ethnic food aisle of large supermarkets. I use Kohinoor XL for biryani.
Ghee: Good quality ghee adds an iconic aroma to the biryani. I prefer to use homemade ghee, but any good-quality store brand will work great.
Fried Onions: Caramelized onions are a key ingredient in biryanis. It takes about 10-12 minutes to brown them on the saute setting. If you're in a rush, feel free to use store-bought fried onions and make this biryani in just 30 minutes. Make sure to check their expiration date as stale onions can spoil the taste of the dish.
Aromatics: Like many classic Indian dishes, this one also uses fresh ginger, garlic, serrano chili, and fresh cilantro to give a beautiful fragrance to the rice. You can also add a bay leaf to add to the flavor. Saffron is another flavor builder in biryani. To extract the best taste and color, we soak it in warm milk for a few minutes.
Yogurt: Plain yogurt adds a creamy and slightly tangy flavor in this recipe. If using Greek yogurt instead, add 3 tablespoons instead.
Spices: We need common Indian spices like cumin seeds, turmeric powder, coriander, cumin, garam masala, Kashmiri red chili, and salt to flavor this biryani. To make it mild, substitute red chili powder with sweet paprika.
Vegetables: We're using potatoes, carrots, and bell peppers here. To ensure even cooking, cut the potatoes and carrots in a consistent size, about ½-inch. Scroll below and read more about customizing the vegetables.
Paneer (Optional): Paneer is optional, but adds protein to this recipe making it a balanced one-pot meal. Make your own by using this easy homemade paneer recipe, or use your favorite brand.
Scroll to the recipe card for a detailed list of ingredients and quantities.
Step-by-Step Instructions
Here are the detailed steps with pictures for making Vegetable Biryani in Instant Pot.
Prep: Rinse the rice and soak it for 15 minutes while you chop vegetables. After 15 mins, rinse and drain the rice.
Step 1: Saute aromatics and vegetables
- Saute onions and green chilies in ghee (or oil) on Saute mode. Cook for 8-10 minutes, stirring in between till they become light golden brown. Remove half the onions and keep them aside. (pic 1)
- Add cut vegetables, chopped cilantro, and saute for 2 mins. (pic 2)
- Add ginger and garlic paste, and saute for another minute. (Pic 3)
- Add the spices and beaten yogurt. Stir well and use the yogurt to deglaze the pan and scrape off any brown bits at the bottom of the pot. (pic 4)

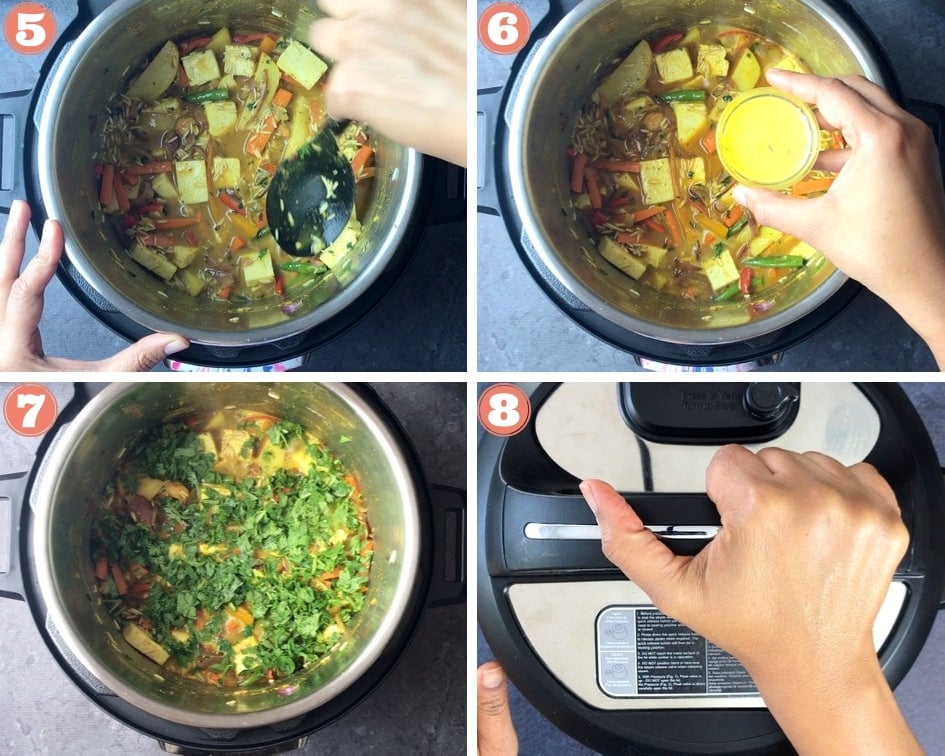
Step 2: Add rice and pressure cook
- Cancel Saute. Add drained rice, cubed paneer, and water. Stir and gently push the rice under the water. (pic 5)
- Spread the saffron-milk mixture over that. Top with reserved caramelized onions and chopped herbs. Top with the remaining 1 tablespoon of ghee or oil. (pic 6 & 7)
- Close lid and pressure cook at Manual/Pressure Cook for 6 mins at LOW pressure. (pic 8)
Step 3: Release pressure and fluff biryani
- After cook time is done, carefully release the pressure manually. Open the lid after the pin has dropped. (pic 9)
- Using silicone mitts, remove the stainless steel insert from the base and place it on a heat-resistant surface (I place it on the stove). This prevents the biryani from overcooking.
- Let it sit uncovered for 5 mins, which helps evaporate excess moisture. After 5 mins, fluff the biryani gently with a fork. Serve warm with your favorite raita (yogurt dip). (pic 10)

What to Serve with Vegetable Biryani
The combination of Biryani and Raita (yogurt dip) is a match made in food heaven! The cool and refreshing yogurt adds a contrast to the warm spices in the rice and ends up balancing the flavors really well.
Enjoy this biryani with a side of Boondi raita, Cucumber Raita, or Avocado raita. Serve it with crisp papad and pickle to complete this Indian comfort food.
For a Vegan Biryani, skip the yogurt and pair it with papad, pickle, and a simple garden salad dressed with salt, pepper, and fresh lemon drizzle.

Customize the Vegetables
You can customize the vegetables to your liking, but pick vegetables that can withstand a 6 minute pressure cooking time. Root vegetables, like parsnips, white carrots, beetroot, and sweet potato would work great. Green beans and corn are other great options.
I wouldn't recommend zucchini or squash as they turn to mush in that time. If picking cauliflower, cut the florets in roughly 2-inch pieces, so they hold their shape.
Recipe Tips & Notes
- Start with long grain basmati rice, it makes a huge difference in texture and presentation. I use Kohinoor XL.
- Soak the rice for 10-15 minutes. Any longer and I find the Biryani to be mushy. You can suit your taste and soak for up to 30 mins if you prefer the rice super soft.
- Using low pressure is key in this recipe. Since vegetables tend to over cook in pressure cooking, low pressure prevents that and maintains a nice texture for vegetables.
- Adding paneer is totally optional, but highly recommended. It adds protein to this dish and makes it a well balanced meal. You can use homemade or buy it from an Indian grocery store.
- If you have store-bought fried onions on hand, skip the onion saute step in the beginning and use that instead.
- Quickly releasing pressure is the ideal option, it prevents the rice and vegetables from over cooking, but if you want to avoid the high pressure release, wait 5 minutes and then manually release it.
- Removing the stainless steel insert after cooking also prevents the rice and vegetables at the bottom from over cooking.
- Letting the biryani sit uncovered for 5 minutes helps evaporate any excess moisture. This leads to a light and fluffy biryani.
- Saffron is a key ingredient in Biryani. It adds a nice floral aroma and crimson color to the rice. However, if you do not have in on hand, you can skip it.
- To prevent the 'burn' sign, remember to deglaze the pot really well after browning the onions.
Frequently Asked Questions
To make Vegan Vegetable Biryani, simply replace ghee with any clear oil, paneer with tofu, and use a few tablespoons of plain coconut or cashew yogurt instead of using regular yogurt.
It is extremely important to deglaze the pot after sauteing. Yogurt helps scrape any brown bits at the bottom of the pan that may have formed while browning the onions. If needed, add a little water and scrape them off.
Biryani and Pulao (pull-aa-o) are both made with a combination of rice with meat, or rice with vegetables, but they differ slightly. Biryani is a spicier layered casserole, whereas pulao is a milder preparation with no specific layering requirements. Biryani often consists of fried onions as a key ingredient, whereas onions are optional in Pulao.
Popular Biryani Recipes
These recipes are part of the Instant Pot Rice Recipes Collection.


📖 Recipe

Easy Instant Pot Vegetable Biryani Recipe
Want to save this recipe?
Video
Equipment
Ingredients
- 3 tablespoon ghee or oil, to be split in 2 steps
- 1 large onion thinly sliced, about 2 cups
- 2 tablespoon cashews whole, about 15
- 1 tablespoon ginger 1-inch piece, grated or crushed
- 1 tablespoon garlic 3-4 cloves, grated or crushed
- ¼ cup plain yogurt
- 1 cup basmati rice soak for 15 mins, rinsed and drained
- 1¼ cup water
- 1 pinch saffron about 10-12 strands soaked in 2 tablespoon milk
- ¼ cup cilantro Chopped (can use cilantro + mint too)
- 1 cup paneer sliced thick, (optional ingredient)
Vegetables
- 2 green chillies Serrano or jalapeno, whole
- 1 cup potato 1 medium gold potato cubed
- ½-¾ cup carrot 1 medium carrot, sliced thick
- 1 cup red pepper sliced
Spices
- 1½ teaspoon salt
- ½ teaspoon turmeric
- 2 teaspoon garam masala
- 2 teaspoon ground coriander
- 1 teaspoon ground cumin
- ½-1 teaspoon Kashmiri red chili powder adjust to taste
Instructions
- Rinse and soak rice for 15 minutes while you chop vegetables. After 15 mins, rinse and drain the rice.
- Turn on saute mode on high and wait till the display reads 'hot'. Add 2 tablespoons ghee or oil, add the onions and green chilies. Saute for 8-10 minutes, stirring in between till they become light golden brown. Remove half the onions and keep aside.
- Add cubed potato, sliced peppers, carrots, cashew, and 2 tablespoons chopped cilantro. Saute the vegetables for 2 mins.
- Add ginger and garlic paste and saute for another minute.
- Add the spices- salt, turmeric, garam masala, coriander, cumin, and beaten yogurt. Stir well and use the yogurt to deglaze the pan and scrape off any brown bits at the bottom of the pot.
- Turn off Saute. Add drained rice, paneer, and water. Stir and gently push the rice under the water. Spread the saffron-milk mixture over that. Top with reserved caramelized onions and chopped cilantro. Top with remaining 1 tablespoon of ghee or oil.
- Close lid and pressure cook at Manual/Pressure Cook for 6 mins at LOW pressure. Once it's done cooking, carefully release the pressure. Open the lid after the pin has dropped.
- Using silicone mitts, remove the stainless steel insert from the base and place it on a heat-resistant surface. This prevents the biryani from overcooking. Let it sit uncovered for 5 mins, which helps release the excess moisture.
- After 5 mins, fluff the biryani gently with a fork. Serve warm with your favorite raita (yogurt dip).
Notes
- Start with long grain basmati rice, it makes a huge difference in texture and presentation. I use Kohinoor XL.
- Soak the rice for 10-15 minutes. Any longer and I find the Biryani to be mushy. You can suit your taste and soak for up to 30 mins.
- Using low pressure is key in this recipe. Since vegetables tend to over cook in pressure cooking, low pressure prevents that and maintains a nice texture for vegetables.
- Adding paneer is totally optional, but highly recommended. It adds protein to this dish and makes it a well balanced meal.
- To make Vegan Vegetable Biryani, replace ghee with any clear oil, and paneer with tofu, or skip that. You can skip the yogurt and add 2-3 tablespoons of plain cashewgurt.
- If you have fried onions on hand, skip the onion saute step in the beginning and use that instead.
- Quickly releasing pressure is the ideal option, it prevents the rice and vegetables from over cooking.
- Removing the stainless steel insert after cooking also prevents the rice and vegetables at the bottom from over cooking.
- Letting the biryani sit uncovered for 5 minutes helps evaporate any excess moisture. This leads to a light and fluffy biryani.
- Saffron is a key ingredient in Biryani. It adds a nice floral aroma and crimson color to the rice. However, if you do not have in on hand, you can skip it.


Barry Rogers says
Hi Aneesha, can i add broccoli and cauliflower to the recipe or will they over cook. I live in New Zealand.
Aneesha Gupta says
Hi Barry, unfortunately, broccoli or cauliflower florets will overcook with this cooking time.
Tamalita says
We love biryani and I finally decided to try and make my own. I was skeptical about the cooking time, but gave it a go and wow oh wow, this id delicious!! the seasonings are *just right*, the veggies are cooked to perfection. Thank you!!
Aneesha Gupta says
I'm so happy to hear that, thank you! Hope you try other biryani recipes on the blog and love them too.
Teri says
I used 1.5 jalapeños, chopped and seeds removed, instead of whole. Thank you so much for the detailed instructions - it worked perfectly in the instant pot and was so delicious.
Aneesha says
Hi Teri, thank you! I'm super glad you enjoyed it!
Kim says
I don't have an insta-pot (or anything similar). Do you have suggestions on how to do it w/out one.
Thank you.
Aneesha says
Hi Kim, that would be a different approach, that's hard to explain here. I'll try to make a separate recipe for that. Thanks!
Stuart Lane says
Lovely recipe but both times I've done it in my ninja foodiive had the add more water warning. It's worked by just leaving it in the pot for a while and guessing when it might be ready.
Aneesha says
Hi Stuart, Some cookers are notorious for giving that warning. I would recommend deglazing the pot really well before adding the rice next time. That seems to work for most readers. I'm so glad you enjoy the flavors!
Nisha says
Hi Aneesha,
Apologies - I have only seen your response (from May 2021) now, as I intend doubling the recipe tomorrow, so thought it would be easier to adjust the quantities on the recipe calculator - I have, to date, not used any other recipe for briyani as this one is just perfect.
Thanks for editing the recipe to include the chilli powder and wish me luck with preparing double the quantity 😉
Aneesha says
How sweet of your Nisha, thank you. I hope you enjoy the biryani!
Nisha Singh says
Good day Aneesha,
I wanted to thank you for this really easy and extremely tasty Biryani recipe - I have made it 3 times now, and we have thoroughly enjoyed it all 3 times.
Just a quick note however, the list of ingredients and the instructions does not include the chilli powder - luckily for me, I watched the video prior to making the recipe the first time (I love the addition of videos - makes cooking in an Instant Pot less daunting 🙂 ) and noticed the addition of this on the video, hence I have been adding Kashmiri chilli powder along with the other spices
Other than that, a huge thank you for a delicious recipe!
Aneesha says
Hi Nisha, thank you so much. I'm so glad you enjoy this recipe. And thank you for pointing out about the chili powder. I'll edit the ingredient list right now:) I appreciate you taking the time to comment and hope you try more recipes on the blog!
meera Kharbanda says
Hi, Im using an 8 qt? Will I need to change anything to the recipe? Thanks
Aneesha says
Hi Meera, it will be better to add a little more water and rice for an 8qt. You can either double the entire recipe or simply add another 1/2 cup rice + 1/2 cup water + 1/4 tsp salt to this one. Enjoy!
Anil says
Just tried this recepie and for some reason my rice turned out not fully cooked. Used Basmati rice.
Could it be beacuse I used some vegies and patato? If so what can I do next time?
Thanks.
Aneesha says
Hi Anil, did you soak the rice? Sometimes, basmati rice takes longer to cook depending on how aged it is. If it was only a little bit undercooked, add another minute next time (6 mins). Hope it turns out perfect next time.
Shalani says
Hi there !!
Can this be reheated ? If so how?
Aneesha says
Hi Shalani, just sprinkle some water over the biryani, heat in microwave for 2 minutes, or in a preheated oven at 350F for 10-15 minutes.
Apoorva says
This recipe looks great and easy to follow! Would any adjustments need to be made if I use brown basmati rice instead of white?
Aneesha says
Hi Apoorva, thank you. Brown rice won't work for this recipe. It takes 22 minutes for brown rice and the veggies will get mush in that time. Hope this helps!