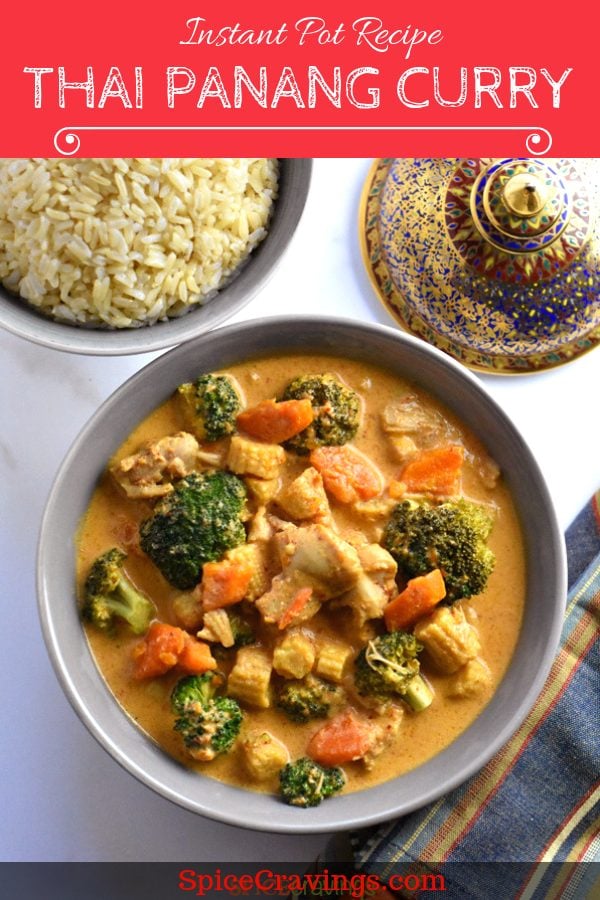
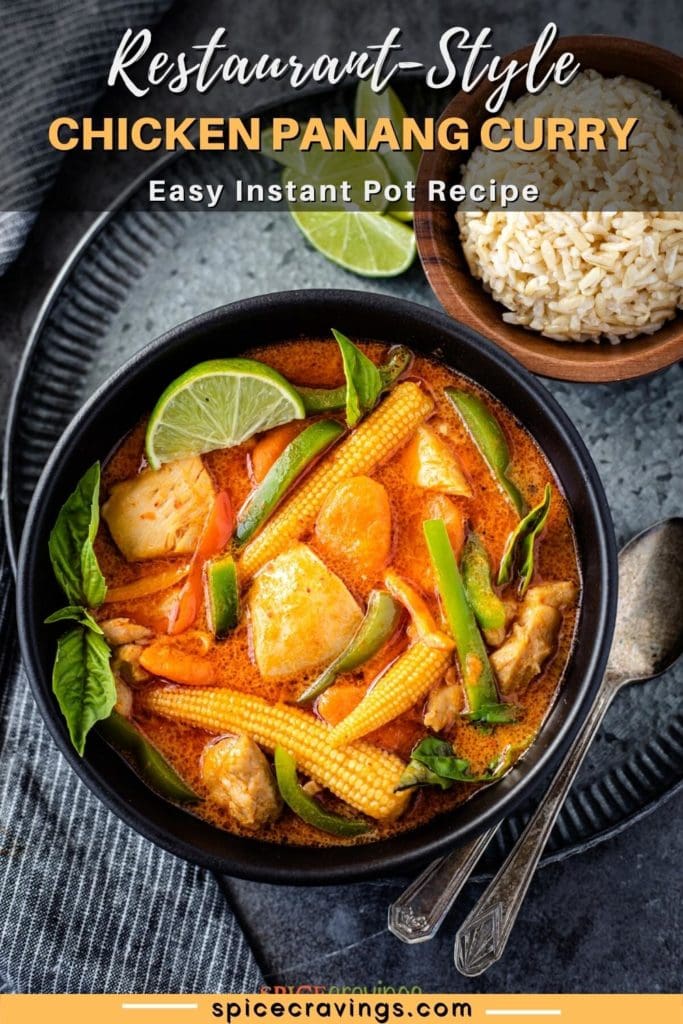
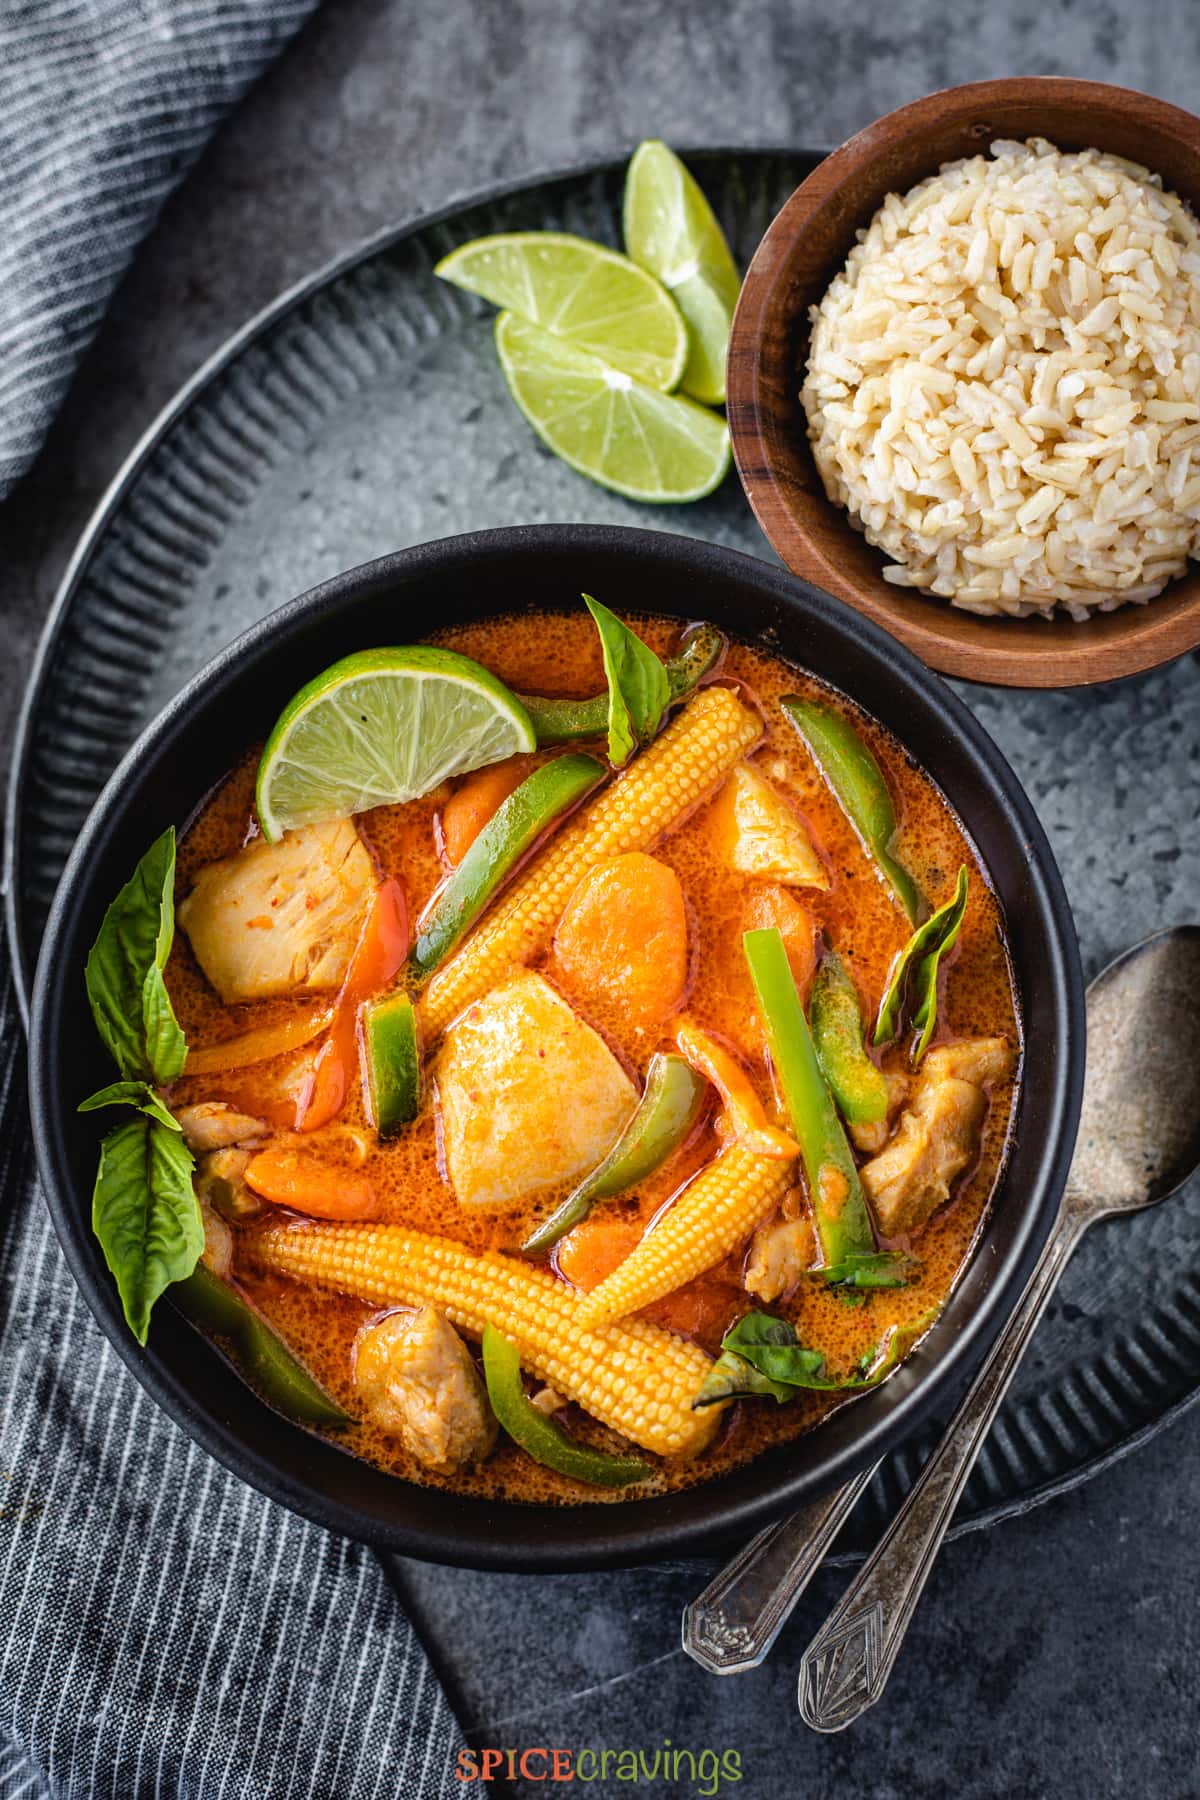
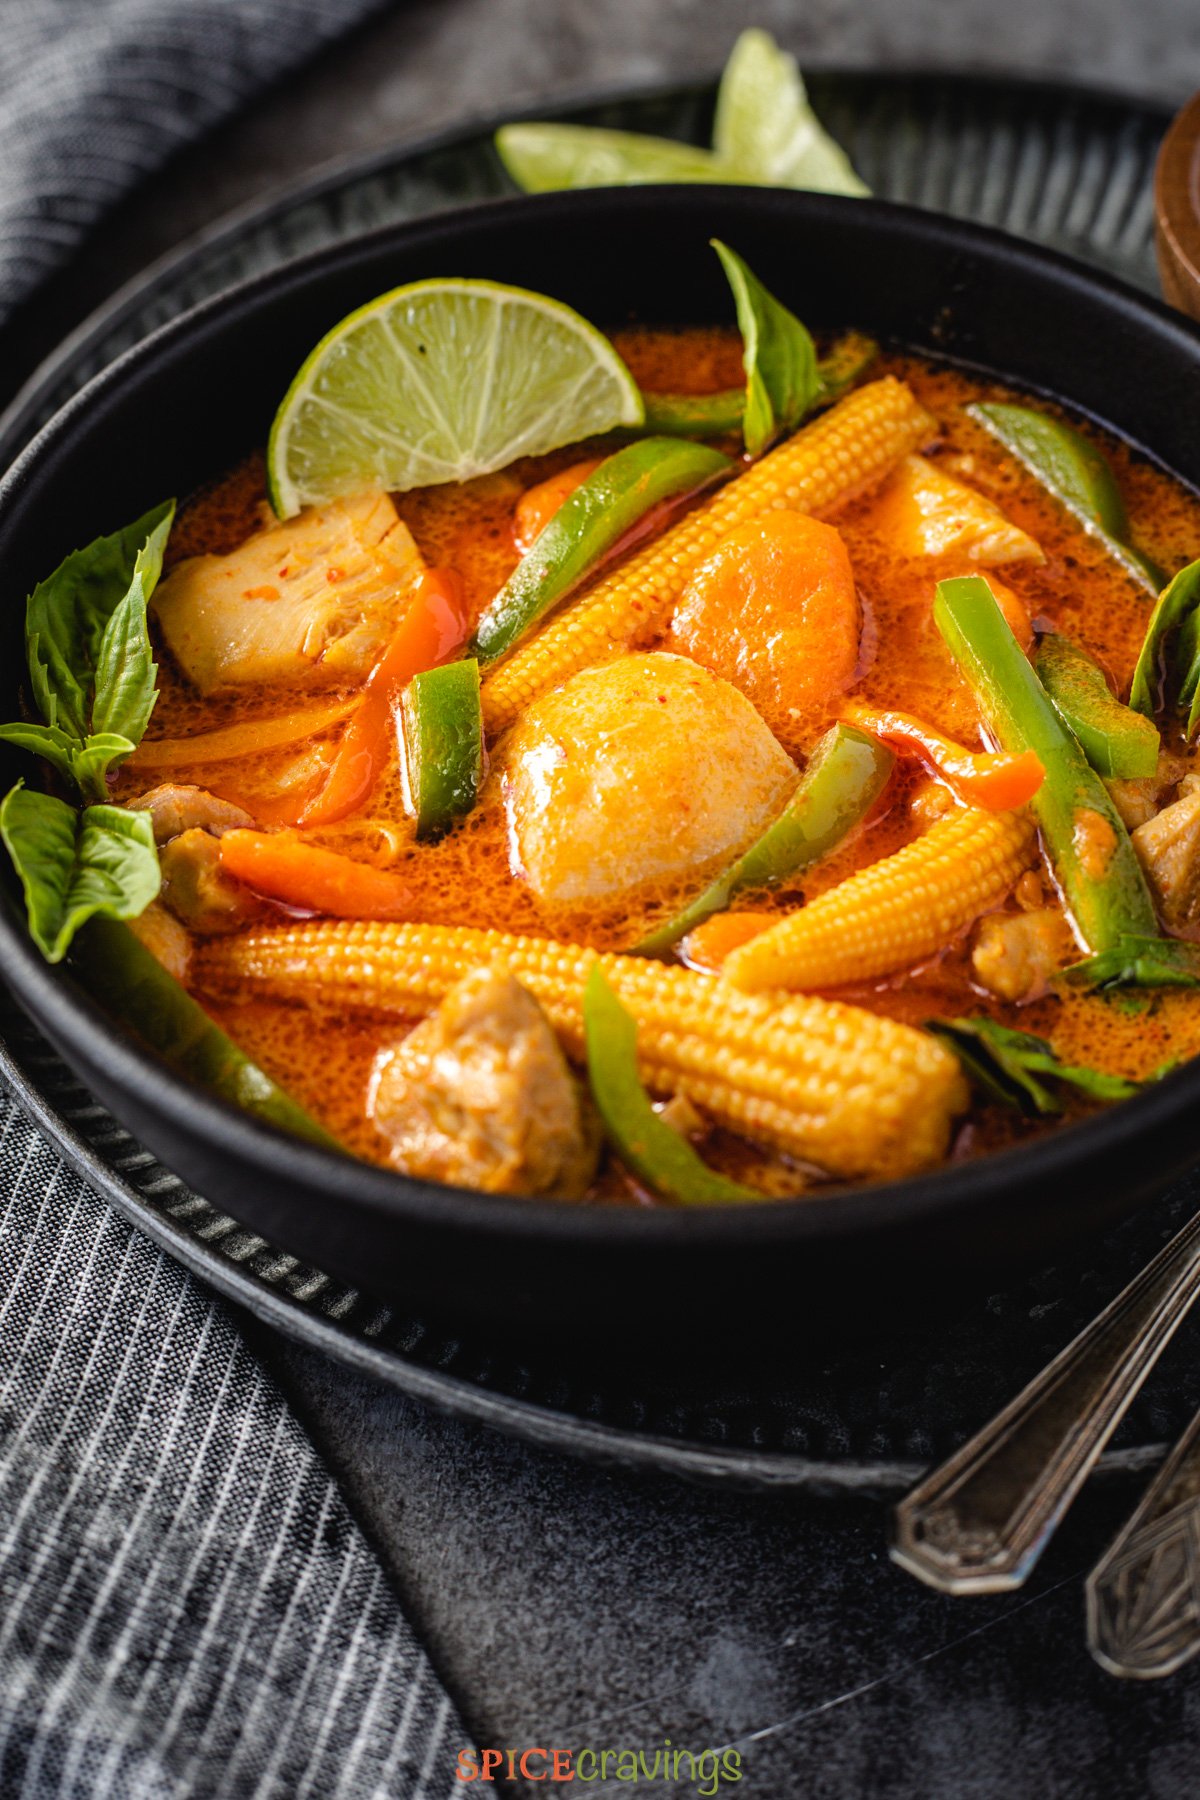
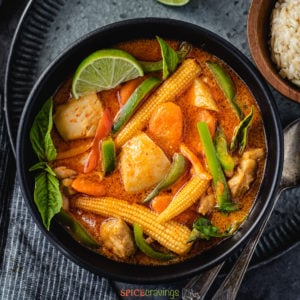
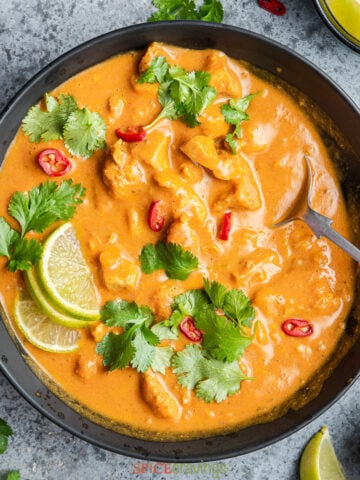
Chicken Panang Curry, or Penang curry, is a spicy, sweet-yet-salty Thai curry filled with juicy chicken thighs and a colorful medley of vegetables. Here's an easy recipe for an authentic restaurant-quality dish, made in under 30 minutes in the Instant Pot.
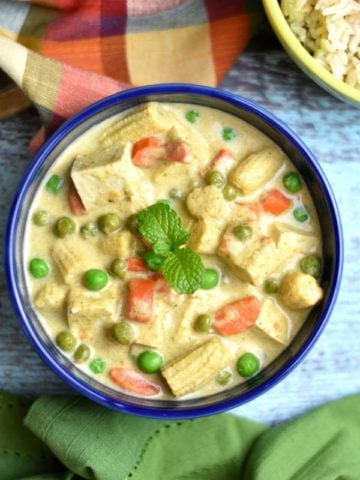
Enjoy this creamy coconut curry over a bed of white or brown Jasmine rice, or keep it low-carb with a side of cauliflower rice.
Want to save this recipe?
Thai Panang Chicken Curry, known as Gaeng Panang Gai in Thailand, is a highly recognizable delight thanks to its bright red hue.
It gets its color from Panang curry paste - a special combination of dried chili pepper, garlic, galangal (Thai ginger), Kaffir lime, lemongrass, and a handful of warm spices.
Its spicy, pungent bite is mellowed by sweet and creamy coconut milk, simmered away with chicken and veggies, then finished with fresh lime juice and a touch of coconut sugar.
In this easy Panang curry recipe, I take the same restaurant-quality approach, with a little help from the grocery store!
Jump to:
Why You'll Love This Recipe
- It's an authentic panang curry, taking much inspiration from restaurants and using high-quality ingredients from Thailand.
- Totally customizable based on your family's favorite vegetables and preferred spice level! I offer plenty of shopping tips and cooking tricks to truly make this curry recipe your own.
- It's naturally gluten-free, with the option to make it pescatarian or vegan!
How to Cook Panang Chicken Curry
This Instant Pot Panang curry is ready in less than 30 minutes, giving me enough time to cook rice and/or cauliflower rice, while my girls set the table.
Ingredients - Notes & Substitutions
Many of the ingredients for Penang curry can be found in the global section of supermarkets or your favorite Asian specialty market.

Coconut Milk: The taste and creaminess of coconut milk play a big part in Thai curries. My tried and trusted brand of coconut milk is Chaokoh. Whichever brand you choose, make sure it is a full-fat version. Give it a good shake before opening.
Panang Curry Paste: I prefer to use Maesri Thai Panang Curry Paste for its authentic taste and because it is made with vegetarian ingredients (no shrimp paste). Mae Ploy is another trusted brand.
Fish Sauce: Fish sauce is a pungent, super salty addition that adds a special umami kick. Use soy sauce or gluten-free tamari, depending on your dietary needs.
Baby Corn: Baby corn adds a nice crunch and slightly sweet flavor. Purchase it fresh or canned, either whole or already cut in pieces.
Carrots: Carrots are a favorite in our home and another sweet addition. Yukon gold or sweet potatoes can be used in their place.
Chicken Thighs: Boneless, skinless chicken thighs offer wonderfully rich and succulent meat that almost falls apart once cooked. Shrimp or tofu are great substitutions, depending on your preference. Check out the variations below.
Palm Sugar: Coconut palm sugar or even regular brown sugar balances out the spicy chili paste.
Lime Juice: For a burst of freshness and to cut the richness. Make sure to have some extra lime wedges on the side for serving.
Bell Pepper: Any color of bell pepper is good - red, orange or yellow. The real trick is adding it after pressure cooking to preserve its crunch and color.
Thai Basil Leaves: Thai basil leaves, with a much stronger anise flavor, are hard to come by, but they can be found in Asian specialty markets. If unavailable, you can mimic the same flavor with regular Italian basil and a few fresh mint leaves.
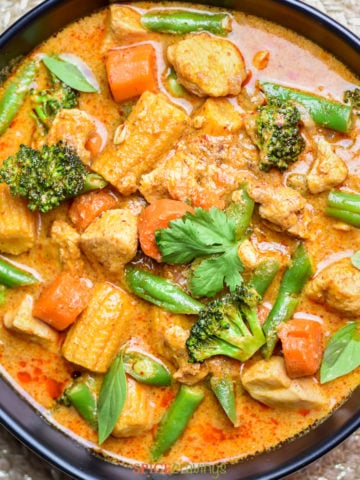
Broccoli: A great way to get in some greens, make sure to add the broccoli or whichever green vegetable you choose at the very end. Snap peas or zucchini cubes are a great sub when in season.
Peanut Butter: This is optional, and adds a creamy-nutty finish. A little goes a long way, so just use a teaspoon or two and work your way up. Use natural peanut butter for the best flavor.
Scroll to the recipe card for a detailed list of ingredients and quantities.
Step-by-Step Instructions
I adore the Panang chicken and veggies written here, but offer plenty of protein and vegetable swaps, with respective cooking times below. Make it your own with whatever combination you prefer!
Pressure Cook
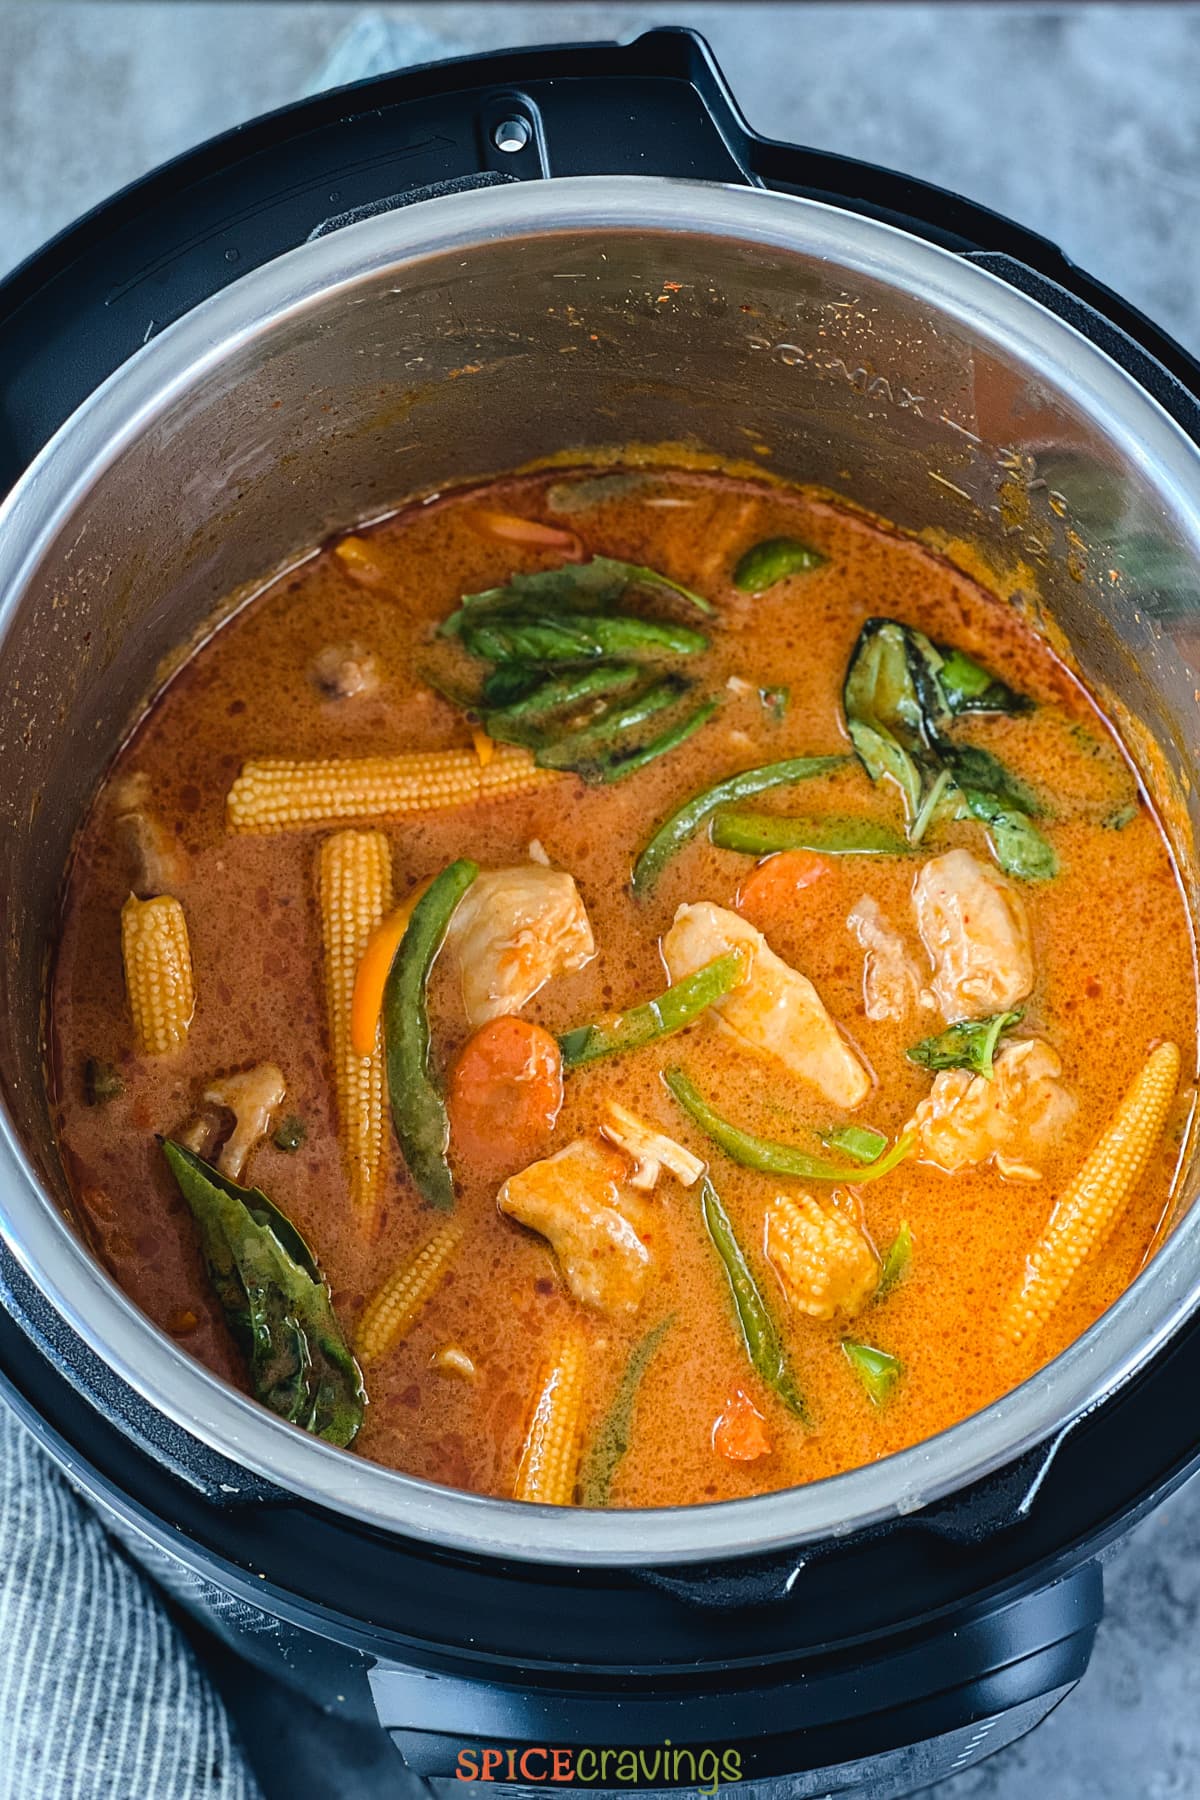
Heat the Instant Pot on Saute mode. Add coconut milk and curry paste, and stir well until it blends with the coconut milk (Pic 1). Add fish sauce, baby corn, carrots (or whatever root vegetables you are using).
Now add the chicken pieces and stir everything (Pic 2). When the curry begins to simmer, cancel saute. Close the lid and set the vent to sealing position (Pic 3).
Select Manual/Pressure, adjust the pressure to 'low', and set 3 minutes. Once the cooking is done, let the pressure release naturally for 5 minutes followed by manual pressure release. Open the lid once the pin drops.

Simmer & Serve
Turn on Saute mode. Stir in brown sugar, lime juice, and peanut butter (if using) (Pic 4). Adjust seasoning at this point. If the curry looks too runny, simmer it for a few minutes on saute mode.
When happy with the consistency, add bell pepper and simmer for 1-2 minutes so the peppers stay crunchy (Pic 5). For softer peppers, simmer for 3-4 minutes. Cancel saute and finish with Thai basil, if using (Pic 6).
Note: If adding other quick-cooking vegetables like broccoli, snap peas, or zucchini, add them along with peppers.
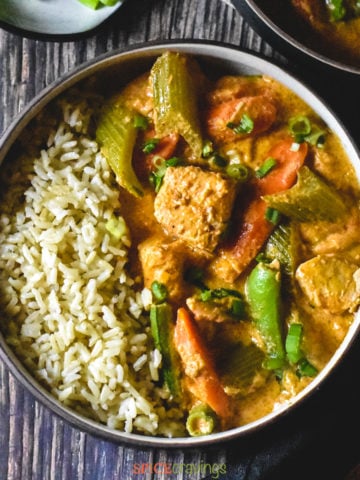
Serve the curry warm with white or brown jasmine rice, or cauliflower rice.
Try a Penang Curry Variation
I make Panang Curry mostly with Chicken, Shrimp, or Tofu along with whatever veggies I have on hand. Possibilities are just endless with this curry. Here are two popular variations:
Add Shrimp: Assemble and pressure cook the curry for 1 minute, without the shrimp. Manually release the pressure, then add the shrimp and cook on saute for 2 minutes, or until the shrimp turn opaque and curl into a 'C'.
Vegetarian Panang Curry: Skip the chicken and pressure cook the curry for 1 minute. Release pressure and turn on saute. Simmer the curry to your desired thickness, then add extra-firm tofu that's been cut into 1-inch cubes. Simmer for 2 minutes and enjoy!
Serving Suggestion
I love to garnish this curry with fresh Thai basil leaves whenever I can find them. Another great alternative is regular basil, but since they're stronger in flavor, just use 2-3 leaves, tear them by hand and garnish.
Thai curries go great with Jasmine rice, a local long-grain variety of white rice with a mild, floral aroma. Go for white or brown rice, whichever is your favorite.
When I make this for hubby and me, I always have stir-fry a side of low-carb cauliflower rice to go with it.
How to Store & Freeze
Store leftover Panang red curry in an airtight container in the fridge for up to 5 days. (Note: Shrimp curry is best enjoyed within 3 days).
Freeze: To freeze, first cool completely, then transfer to a freezer-safe container. Label, date, and freeze for up to 1 month. Thaw overnight in the fridge.
Recipe Tips & Notes
- Coconut Milk: Use a good quality, full-fat, canned coconut milk. I use Chaokoh brand. Thai Kitchen is another trusted brand.
- Use Low Pressure: Coconut milk cooks well under LOW pressure and has a much lower chance of curdling, as compared to high pressure.
- If Coconut Milk Curdles: If after opening the lid, the coconut milk seems curdled, don't worry, it hasn't gone bad. The heat and the pressure just separated the fat from the milk. You can turn on saute mode and gently whisk it back together. It'll be a smooth curry once again!
- Curry Paste: I prefer using Maesri brand for Thai Panang Curry paste. It is a vegetarian paste since it doesn't have any shrimp paste. Other brands that work great in this recipe are Mae-ploy and Thai Kitchen.
- Customize the Veggies: Add any veggies of your choice including Yukon gold or sweet potatoes or any variety of peppers. Simply cut the root vegetables into 1-inch pieces for even cooking.
- Get creative: Feel free to add water chestnuts or bamboo shoots at the end to amp up those Thai flavors.
- Curry Consistency: This varies and depends on personal preference. Most restaurants serve a 'thin' Panang curry. To get a thicker curry, saute the curry for a few minutes after pressure cooking. It will thicken up as it cools too.
- Other Proteins: You can make this curry with other proteins, like shrimp or tofu. Check out the variations section for their respective cooking times.
- Make it Vegan: Turn it into a vegan panang curry by replacing the chicken with tofu and swap out the fish sauce for soy sauce or gluten-free tamari.
Frequently Asked Questions
Panang curry paste will vary by brand, but they all typically include dried red chili peppers, garlic, galangal (Thai ginger), shallot, lemongrass, Kaffir lime, coriander, and cumin.
Panang curry has a spicy, sweet-yet-salty, nutty flavor thanks to red curry paste, fish sauce, and peanut butter.
Yes - the heat comes from the red chillis in the curry paste, which can be adjusted based on your preferred heat level. Some even add more fresh red chilies to make it even spicier.
Panang (or penang) curry is richer and sweeter than other Thai curries because of its use of coconut milk and the addition of peanuts. This adds a mellow, nutty characteristic, unlike any other curry.
Popular Thai Recipes on the Blog
These recipes are part of the Thai Recipes Collection:

📖 Recipe
Chicken Panang Curry
Want to save this recipe?
Video
Equipment
Ingredients
- 14 ounce coconut milk 1 can - I prefer the Chaokoh brand
- 4 tablespoons Maesri Thai Panang Curry Paste ½ can, or use more depending on taste/spice preference
- 1 tablespoon fish sauce or soy sauce
- 1 cup baby corn whole or cut in half
- 1 cup chopped carrots about 2 medium carrots
- 1 pound boneless skinless chicken thighs cut into ¾ inch pieces
After Cooking
- 1 teaspoon palm sugar or brown sugar
- 1 teaspoon fresh lime juice
- 1 cup bell pepper, sliced green/ red/ orange
- 6-8 Thai basil leaves or regular basil
Optional Ingredients
- 1 cup broccoli florets (can use snap peas or zucchini cubes instead)
- 2 teaspoons creamy peanut butter
Instructions
Pressure Cook
- Heat the Instant Pot on Saute mode. Add coconut milk and curry paste, and stir well until it blends with the coconut milk. Add fish sauce, baby corn, carrots (or whatever root vegetables you are using).
- Now add the chicken pieces and stir everything. When the curry begins to simmer, cancel saute. Close the lid and set the vent to sealing position.
- Select Manual/Pressure, adjust the pressure to 'low', and set 3 minutes. Once the cooking is done, let the pressure release naturally for 5 minutes followed by manual pressure release. Open the lid once the pin drops.
Simmer & Serve
- Turn on Saute mode. Stir in sugar and lime juice. Adjust seasoning at this point. If the curry looks too runny, simmer it for a few minutes on saute mode.
- When happy with the consistency, add bell pepper and simmer for 1-2 minutes so the peppers stay crunchy. For softer peppers, simmer for 3-4 minutes. Cancel saute and finish with Thai basil and peanut butter, if using. Serve the curry warm with white, brown or cumin rice.Note: If adding other quick-cooking vegetables like broccoli or zucchini, add them along with peppers.
Notes
- Coconut Milk: Use a good quality, full-fat, canned coconut milk. I use Chaokoh brand. Native Forest is another trusted brand.
- Use Low Pressure: Coconut milk cooks well under LOW pressure and has a much lower chance of curdling, as compared to high pressure.
- If Coconut Milk Curdles: If after opening the lid, the coconut milk seems curdled, don't worry, it hasn't gone bad. The heat and the pressure just separated the fat from the milk. You can turn on saute mode and whisk it gently back together. It'll be a smooth curry once again!
- Curry Paste: I prefer using Maesri brand for Thai Panang Curry paste. It is a vegetarian paste since it doesn't have any shrimp paste. Other brands that work great in this recipe are Mae-ploy and Thai Kitchen.
- Customize the Veggies: You can add any veggies of your choice including Yukon gold or sweet potatoes or any variety of peppers. Simply cut the root vegetables into 1-inch pieces for even cooking.
- Get creative: Feel free to add water chestnuts or bamboo shoots at the end to amp up those Thai flavors.
- Curry Consistency: This varies and depends on personal preference. Most restaurants serve a 'thin' Panang curry. To get a thicker curry, saute the curry for a few minutes after pressure cooking. It will thicken up as it cools too.
- Other Proteins: You can make this curry with other proteins, like shrimp or tofu. Check out the variations section for their respective cooking times.
- Make it Vegan: Turn it into a vegan panang curry by replacing the chicken with tofu and swap out the fish sauce for soy sauce or gluten-free tamari.


patti with an i says
We love this recipe and make it at least once a week, especially now that we're not going out to eat. I do have one question: do you also find that the coconut milk leaves a film on the IP liner that is very, very difficult to remove? Any suggestions?
Aneesha says
Hi Patti, thank you! I'm so glad you enjoy this recipe too- I make it a few times a month:) I haven't had that problem, but it's probably the fat layer that's not getting cleaned. I would recommend running a steam cycle with juice of half a lemon or lime. Here are the steps: https://spicecravings.com/instant-pot-water-test
Debba says
Made this today. Thank you for a wonderful recipe. I did pretty much everything as directed, with the minor substitutions being regular basil (which I have growing in a pot on my window sill, yay!) and I used coconut sugar, as I didn't have palm. The only other different thing I did was make Basmati rice pot-in-pot (1 C rice with 1 C water), which worked very well. Only thing I'd do differently is not add the 1/4 cup of water to the curry, and add a little more water to the rice. These are minor tweaks to an otherwise delicious recipe. Just fabulous. Thanks so much! I know what I'll be doing with the second half of that little can of paste! 🙂
For science: I use an 8 qt Instant pot.
Aneesha says
Hi Debba, thank you! I'm so glad you enjoyed this recipe, and making pot-in-pot rice is such a genius improvisation! For long grain rice, I follow 1 +1/4 cups water to 1 cup rice ratio! I hope you try the other Thai curries as well!
Debba says
So, here it is 3.5 years later, and I am still making this recipe. I'm amazed at the passage of time. By now, I'm playing very fast and loose with the instructions. 🙂 It is a good base recipe for doing whatever you want and using up the dying veggies languishing in the fridge. I also use whatever variety of Maesri I happen to grab (I got an assortment pack from Amazon) and I use the whole can. The chicken thighs from Imperfect Foods is a 14 oz package, so that's what gets used. I say all this so subsequent readers know they can work with what they have, and this recipe will still turn out wonderfully. I also took your advice and added the 1/4 C water into the PIP rice, and I never add it to the curry. Thanks again for a great recipe.
Aneesha says
Hi Debba, I'm so so happy that you enjoy this recipe, it's on rotation in my home as well. Thank you for taking the time to share your feedback!
blaah says
Low or high pressure? At the top of the page you say to cook on high, but elsewhere it says low?
Aneesha says
Sorry about that, It's low pressure. I'll fix that. Hope you enjoy it!
Cathy says
When did you add the Thai basil? I don’t see it in the instructions, but I may be overlooking it Thanks!
Aneesha says
Hi Cathy, stir it in towards the end, just before serving. I'll double check the instructions to make sure it's clearly stated, thanks for pointing it out. Hope you enjoy this recipe!
Christine says
I absolutely LOVED the flavor of this. Next time I will omit the water (the sauce was too thin for my liking - I ended up adding some cornstarch to thicken it and it was still thin). I doubled the recipe and cooked it for 5 mins on high pressure instead of 3 plus used one can full-fat coconut milk and one can lite coconut milk (probably didn’t help the watery nature!!) and otherwise followed the instructions in the recipe. I just sent the recipe to 3 different friends because I am so in love with the taste!!!
Aneesha says
Hi Christine, thank you! I'm so glad you enjoyed it. The consistency of the sauce tends to vary on this one, but I'll include that in the notes, thanks for your feedback. Thank you so much for sharing it too! Hope you try the other Thai recipes on the blog- if you're into soups, I recommend the Thai Red Curry Soup! Enjoy!
Kassie says
Made this tonight substituted parsnips for carrots and added some mushrooms and it was delicious. The is definitely going in our normal rotation!
Aneesha says
Yay, so happy to hear that. Thanks Kassie!
Ronil says
Thank you for sharing the recipe, I tried it out and came out well!
aneeshasg says
Hi Ronil, thank you for trying this recipe. I'm glad you enjoyed it and thanks for sharing.